物體檢測已成為一項核心創新,應用於計算機視覺、安全和身份驗證措施、犯罪檢測、交通、實時影象分析等多個領域。通過在網路應用程式中利用 TensorFlow 的功能,我們可以使用張量模型實現高效的物體檢測。本文旨在深入介紹物件檢測,並以例項說明將物件檢測整合到網路應用程式中的步驟。
物體檢測在各個領域的重要性怎麼強調都不為過,因為它能帶來諸多好處:
- 人工智慧驅動的汽車:通過實施物體檢測模型,自動駕駛汽車可以輕鬆檢測並正確識別路標、交通訊號燈、人和其他機車,從而有助於在駕駛過程中更好地導航和決策。
- 安全和監控:物體檢測大大增強了安防系統,使監控系統能夠跟蹤和識別人和物,監控行為,並增強機場等公共場所的安全性。
- 醫療保健:作為醫療領域的一項應用,訓練有素的模型可以識別掃描中的疾病和異常。通過這些模型,可以及時發現異常情況並採取補救措施。
- 增強視覺理解和資料表示:利用物體檢測,計算機系統可以理解和解釋圖形資料,並以使用者可以快速吸收的形式表示這些資訊。
什麼是物體檢測?
物體檢測是計算機視覺的一個要素,它利用人工智慧(AI)從影象、視訊和系統的視覺輸入中獲取有意義的資訊。物體檢測模型可以檢測、分類和勾勒視覺輸入中的物體(通常在一個邊界框內),並執行或推薦該模型定義的操作。
物體檢測模型主要由兩個關鍵部分組成:視覺輸入定位和物體分類。視覺輸入定位涉及定位輸入中的物體,並在檢測到的物體周圍指定一個邊界框。這些邊框考慮了檢測到的物體的寬度、高度和位置(x 座標和 y 座標)。物體分類則是為檢測到的物體分配標籤,提供物體的上下文。
什麼是 Tensorflow?
根據文件介紹,TensorFlow 是谷歌開發的一個開源機器學習框架,為計算機視覺、深度學習和自然語言處理等機器學習相關任務提供各種工具和資源。它支援多種程式語言,包括 Python 和 C++ 等流行語言,使更多使用者可以使用它。利用 TensorFlow,使用者可以建立在任何平臺上執行的機器學習模型,如桌面、移動、網路和雲應用。
設定開發環境
在本文中,我們將使用 React.js 和 TensorFlow。首先,請執行以下步驟:
- 在本地計算機上設定 React 應用程式,開啟專案目錄,然後繼續下一步,新增 TensorFlow 依賴關係。
- 在專案根目錄下開啟 shell 視窗,使用以下命令安裝 TensorFlow 依賴項:
npm i @tensorflow/tsfjs-backend-cpu @tensorflow/tfjs-backend-webgl @tensorflow/tfjs-converter @tensorflow/tfjs-core @tensorflow-models/coco-ssd
npm i @tensorflow/tsfjs-backend-cpu @tensorflow/tfjs-backend-webgl @tensorflow/tfjs-converter @tensorflow/tfjs-core @tensorflow-models/coco-ssd
npm i @tensorflow/tsfjs-backend-cpu @tensorflow/tfjs-backend-webgl @tensorflow/tfjs-converter @tensorflow/tfjs-core @tensorflow-models/coco-ssd
我們將開發一個網路應用程式,使用兩種方法檢測物體。第一種方法是檢測上載影象中的物體,第二種方法是檢測攝像頭訊號源中的物體。
利用上傳影象進行物體檢測
在本節中,我們將建立一個物體檢測器,對上傳的影象進行操作,以識別其中的物件。首先,建立一個元件資料夾和一個新檔案 ImageDetector.js。在該檔案中新增以下程式碼:
import React, { useRef, useState } from "react";
import * as cocoSsd from "@tensorflow-models/coco-ssd";
import "@tensorflow/tfjs-backend-webgl";
import "@tensorflow/tfjs-backend-cpu";
const ImageDetector = () => {
// We are going to use useRef to handle image selects
const ImageSelectRef = useRef();
const [imageData, setImageData] = useState(null);
// Function to open image selector
const openImageSelector = () => {
if (ImageSelectRef.current) {
ImageSelectRef.current.click();
// Read the converted image
const readImage = (file) => {
return new Promise((resolve, reject) => {
const reader = new FileReader();
reader.addEventListener("load", (e) => resolve(e.target.result));
reader.addEventListener("error", reject);
reader.readAsDataURL(file);
// To display the selected image
const onImageSelect = async (e) => {
// Convert the selected image to base64
const file = e.target.files[0];
if (file && file.type.substr(0, 5) === "image") {
console.log("image selected");
console.log("not an image");
const image = await readImage(file);
justifyContent: "center",
border: "1px solid black",
{/* Display uploaded image here */}
// If image data is null then display a text
{/* Upload image button */}
<button onClick={() => openImageSelector()}>Select an Image</button>
export default ImageDetector;
"use client";
import React, { useRef, useState } from "react";
import * as cocoSsd from "@tensorflow-models/coco-ssd";
import "@tensorflow/tfjs-backend-webgl";
import "@tensorflow/tfjs-backend-cpu";
const ImageDetector = () => {
// We are going to use useRef to handle image selects
const ImageSelectRef = useRef();
// Image state data
const [imageData, setImageData] = useState(null);
// Function to open image selector
const openImageSelector = () => {
if (ImageSelectRef.current) {
ImageSelectRef.current.click();
}
};
// Read the converted image
const readImage = (file) => {
return new Promise((resolve, reject) => {
const reader = new FileReader();
reader.addEventListener("load", (e) => resolve(e.target.result));
reader.addEventListener("error", reject);
reader.readAsDataURL(file);
});
};
// To display the selected image
const onImageSelect = async (e) => {
// Convert the selected image to base64
const file = e.target.files[0];
if (file && file.type.substr(0, 5) === "image") {
console.log("image selected");
} else {
console.log("not an image");
}
const image = await readImage(file);
// Set the image data
setImageData(image);
};
return (
<div
style={{
display: "flex",
height: "100vh",
justifyContent: "center",
alignItems: "center",
gap: "25px",
flexDirection: "column",
}}
>
<div
style={{
border: "1px solid black",
minWidth: "50%",
position: "relative"
}}
>
{/* Display uploaded image here */}
{
//   If image data is null then display a text
!imageData ? (
<p
style={{
textAlign: "center",
padding: "250px 0",
fontSize: "20px",
}}
>
Upload an image
</p>
) : (
<img
src={imageData}
alt="uploaded image"
/>
)
}
</div>
{/* Input image file */}
<input
style={{
display: "none",
}}
type="file"
ref={ImageSelectRef}
onChange={onImageSelect}
/>
<div
style={{
padding: "10px 15px",
background: "blue",
color: "#fff",
fontSize: "48px",
hover: {
cursor: "pointer",
},
}}
>
{/* Upload image button */}
<button onClick={() => openImageSelector()}>Select an Image</button>
</div>
</div>
);
};
export default ImageDetector;
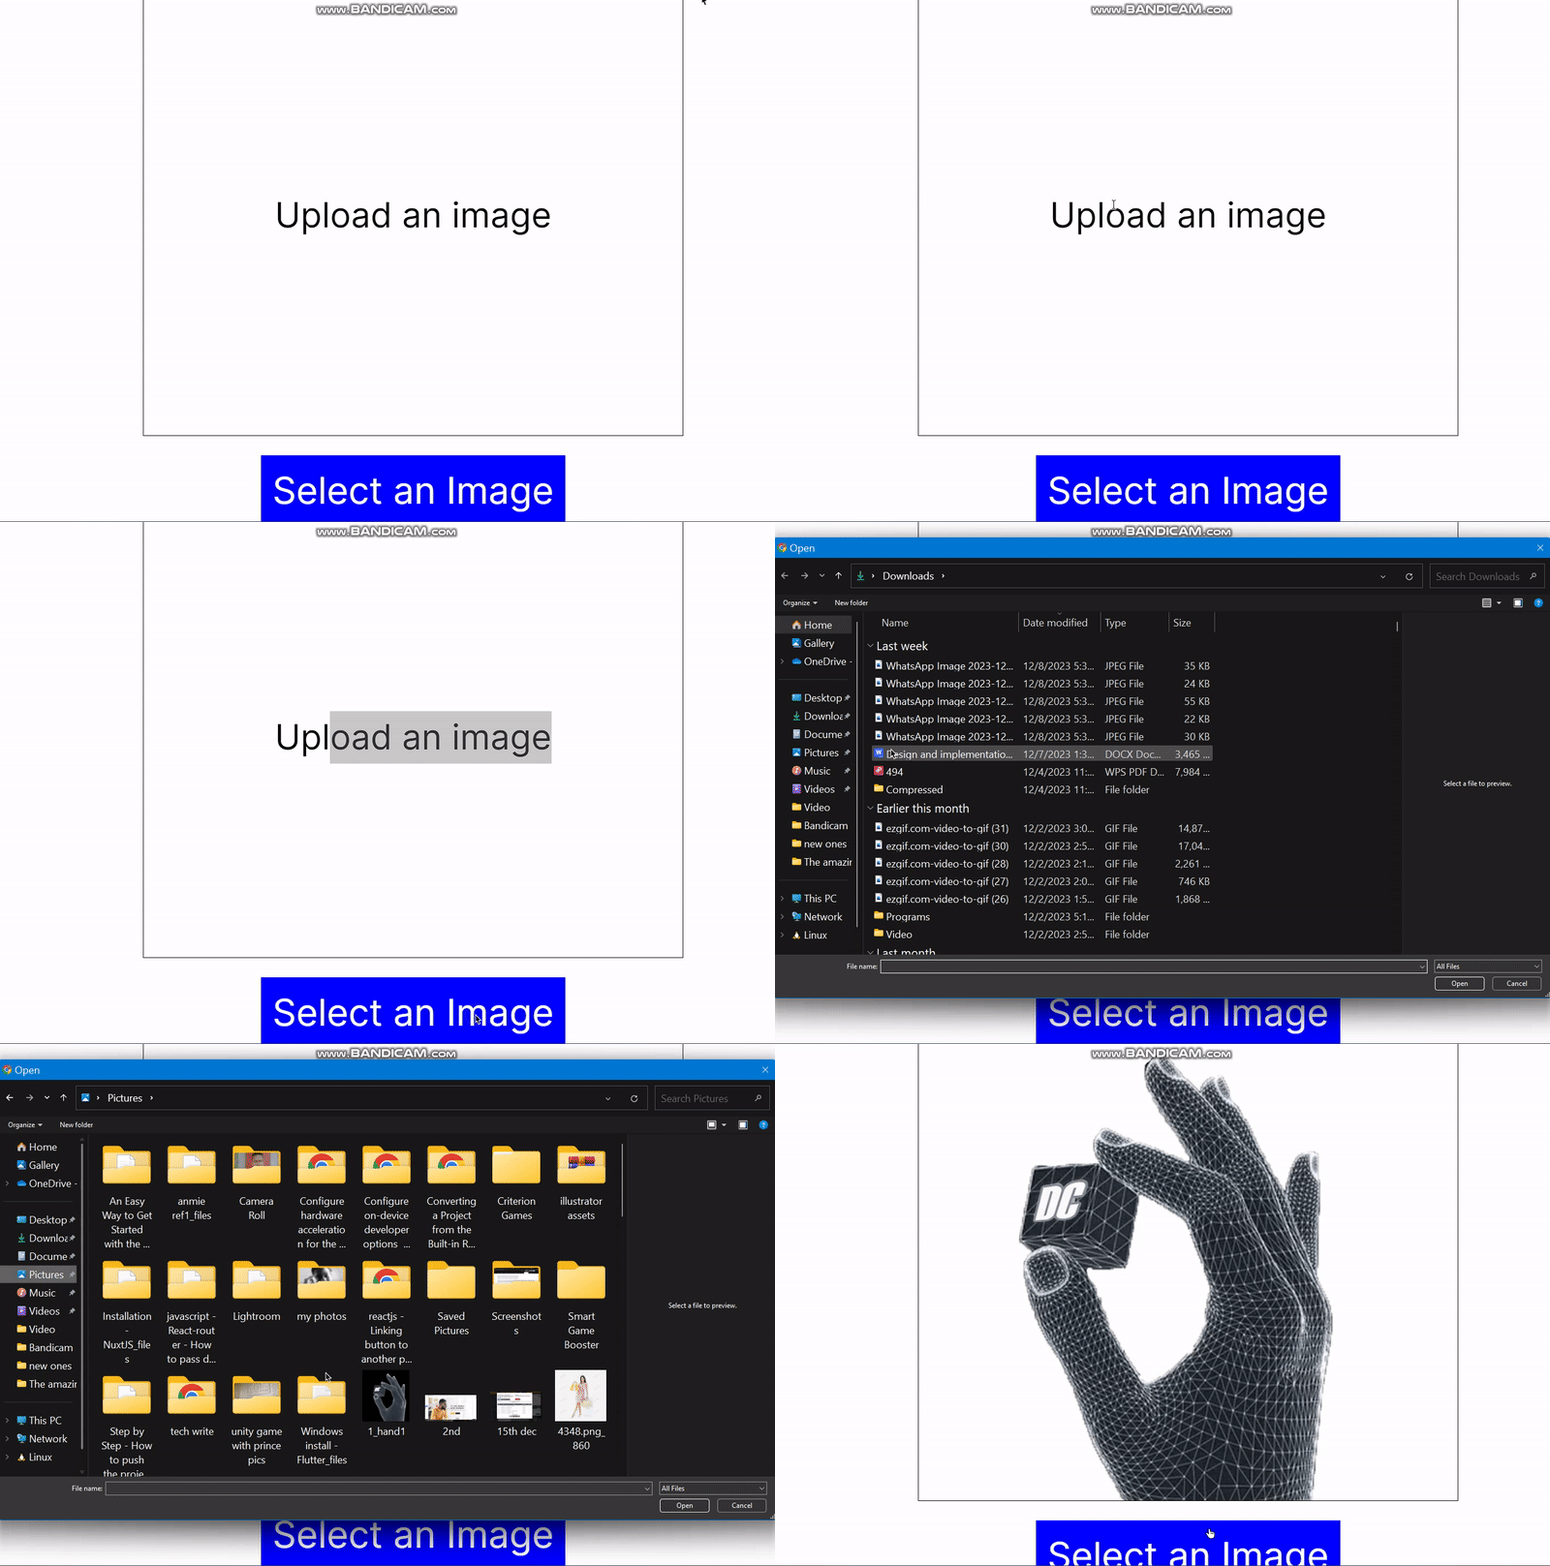
在上面的程式碼片段中,我們使用 useRef 和 FileReader 來處理影象選擇。點選 “Select an Image” 按鈕後,隱藏的檔案輸入將被觸發,檔案選擇視窗將開啟。選定的圖片會轉換為 base64 格式,並使用 JavaScript FileReader 在非同步函式中讀取。此時,imageData 狀態會更新為包含所選圖片,三元運算子會顯示圖片。
要掛載此元件,我們可以在專案目錄 primary app/page.jsx 中新增並渲染它:
import ImageDetector from "@/components/imagedetector";
export default function Home() {
import ImageDetector from "@/components/imagedetector";
export default function Home() {
return (
<div>
<ImageDetector />
</div>
);
}
import ImageDetector from "@/components/imagedetector";
export default function Home() {
return (
<div>
<ImageDetector />
</div>
);
}
如果我們執行應用程式,會得到如下結果:

建立影象物件檢測器
為了處理所選影象中的物體檢測,我們將建立一個新函式,使用我們之前安裝的 TensorFlow Coco-ssd 物體檢測模型:
// Function to detect objects in the image
const handleObjectDetection = async (imageElement) => {
const model = await cocoSsd.load();
// Detect objects in the image
const predictions = await model.detect(imageElement, 5);
console.log("Predictions: ", predictions);
//...
// Function to detect objects in the image
const handleObjectDetection = async (imageElement) => {
// load the model
const model = await cocoSsd.load();
// Detect objects in the image
const predictions = await model.detect(imageElement, 5);
console.log("Predictions: ", predictions);
};
//...
// Function to detect objects in the image
const handleObjectDetection = async (imageElement) => {
// load the model
const model = await cocoSsd.load();
// Detect objects in the image
const predictions = await model.detect(imageElement, 5);
console.log("Predictions: ", predictions);
};
上述程式碼使用 cocoSsd 軟體包來處理物件檢測。我們還將檢測次數限制為 5 次,因為如果執行系統的 GPU 和 CPU 記憶體不足,在瀏覽器上執行多次檢測有時會導致速度變慢。
要建立 imageElement,我們將在 onImageSelect 函式中建立一個元素,並將所選圖片的資料傳遞給它。
// Within the onImageSelect function
// Create an image element
const imageElement = document.createElement("img");
imageElement.src = image;
imageElement.onload = async () => {
handleObjectDetection(imageElement);
// Within the onImageSelect function
//...
// Create an image element
const imageElement = document.createElement("img");
imageElement.src = image;
imageElement.onload = async () => {
handleObjectDetection(imageElement);
};
// Within the onImageSelect function
//...
// Create an image element
const imageElement = document.createElement("img");
imageElement.src = image;
imageElement.onload = async () => {
handleObjectDetection(imageElement);
};
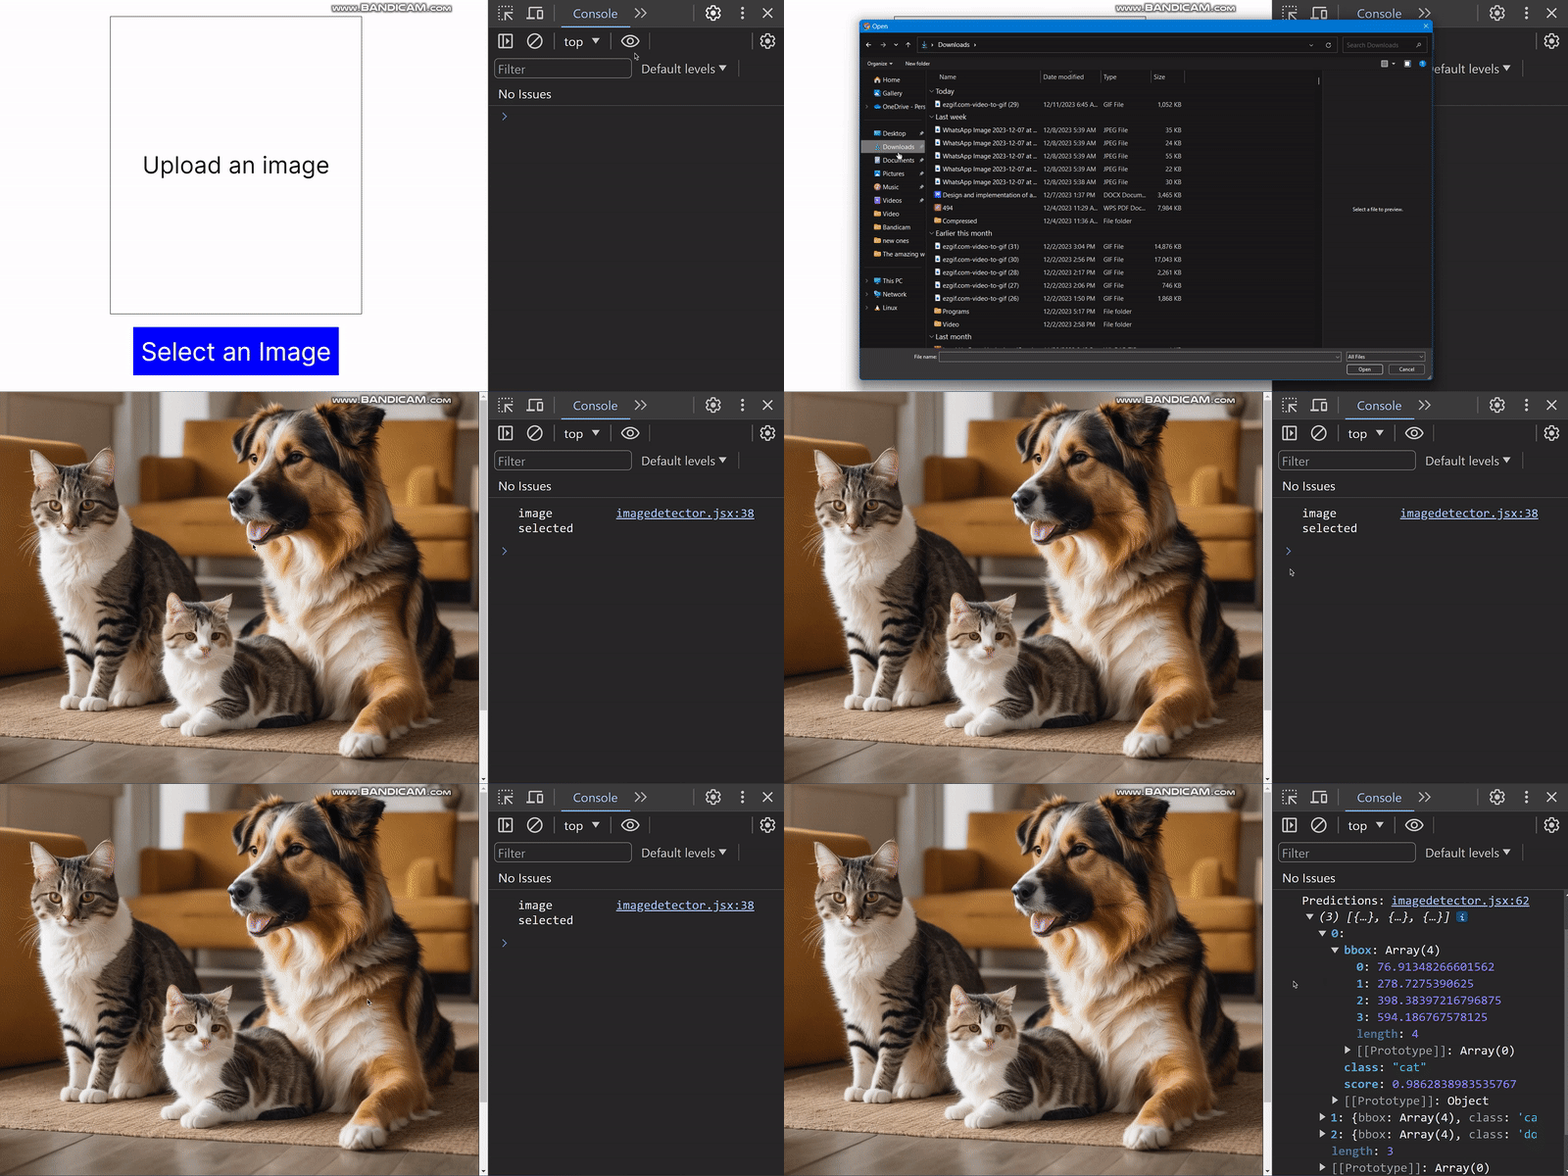
handleObjectDetection 函式返回的 predictions 結果會對所選影象中的物體進行分類,並提供有關其位置的資訊。利用這些資訊,我們將構建一個邊界框。例如,我們可以新增一張狗和一隻貓的圖片,並得到以下結果:

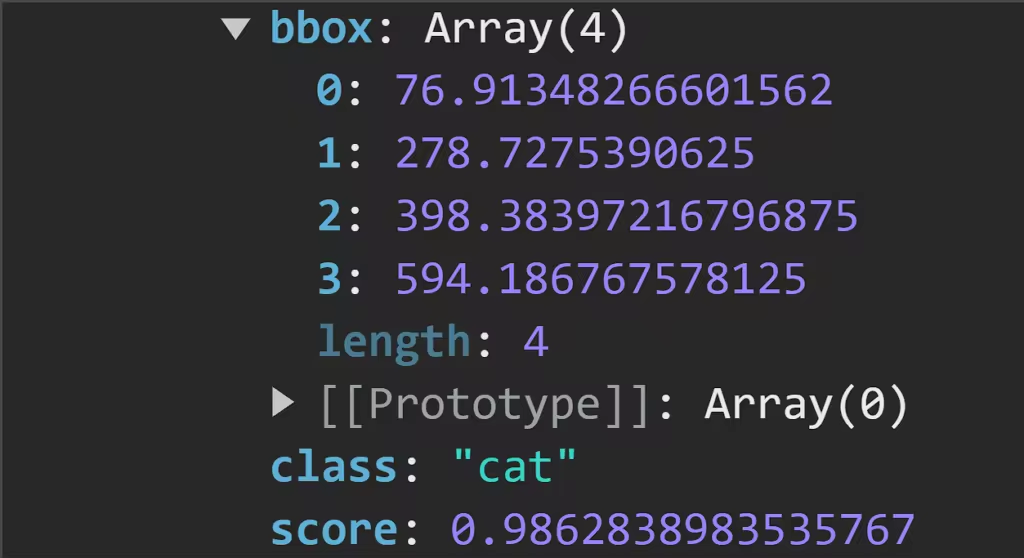
下圖顯示了瀏覽器控制檯中記錄的預測結果:

仔細觀察,我們可以看到物體檢測模型生成的預測結果。
- bbox:提供有關邊界框位置和大小的資訊。
- class:這是影象中物體的分類。
- score:預測準確度的估計值。該值越接近 1,表示預測越準確。
為預測物件構建邊界框
對於預測,我們將建立一個狀態物件,該物件將根據模型返回的預測資料進行更新。
const [predictionsData, setPredictionsData] = useState([]);
// Handle predictions
const [predictionsData, setPredictionsData] = useState([]);
// Handle predictions
const [predictionsData, setPredictionsData] = useState([]);
要使用預測資料更新此狀態,請對 handleObjectDetection 進行以下更改:
// Set the predictions data
setPredictionsData(predictions);
// Set the predictions data
setPredictionsData(predictions);
// Set the predictions data
setPredictionsData(predictions);
我們將使用 predictionsData 陣列建立一個函式,為影象中的每個元素生成一個邊框。要建立獨特顏色的邊界框,我們首先要建立一個顏色陣列和一個函式,以對陣列進行洗牌並提供獨特的顏色部分:
// An array of bounding box colors
const colors = ["blue", "green", "red", "purple", "orange"];
// Shuffle the array to randomize the color selection
function shuffleArray(array) {
for (let i = array.length - 1; i > 0; i--) {
const j = Math.floor(Math.random() * (i + 1));
[array[i], array[j]] = [array[j], array[i]];
}
}
shuffleArray(colors);
最後,我們可以用下面幾行程式碼建立並顯示邊界框:
{/* Create bounding box */}
// If predictions data is not null then display the bounding box
// Each box has a unique color
predictionsData.length > 0 &&
predictionsData.map((prediction, index) => {
const selectedColor = colors.pop(); // Get the last color from the array and remove it
left: prediction.bbox[0],
width: prediction.bbox[2],
height: prediction.bbox[3],
border: `2px solid ${selectedColor}`,
justifyContent: "center",
background: selectedColor,
textTransform: "capitalize",
background: selectedColor,
textTransform: "capitalize",
{Math.round(parseFloat(prediction.score) * 100)}%
{/* Display uploaded image here */}
{/* Create bounding box */}
{
// If predictions data is not null then display the bounding box
// Each box has a unique color
predictionsData.length > 0 &&
predictionsData.map((prediction, index) => {
const selectedColor = colors.pop(); // Get the last color from the array and remove it
return (
<div
key={index}
style={{
position: "absolute",
top: prediction.bbox[1],
left: prediction.bbox[0],
width: prediction.bbox[2],
height: prediction.bbox[3],
border: `2px solid ${selectedColor}`,
display: "flex",
justifyContent: "center",
alignItems: "center",
flexDirection: "column",
}}
>
<p
style={{
background: selectedColor,
color: "#fff",
padding: "10px 15px",
fontSize: "20px",
textTransform: "capitalize",
}}
>
{prediction.class}
</p>
<p
style={{
background: selectedColor,
color: "#fff",
padding: "10px 15px",
fontSize: "20px",
textTransform: "capitalize",
}}
>
{Math.round(parseFloat(prediction.score) * 100)}%
</p>
</div>
);
})
}
{/* Display uploaded image here */}
//... Other code below
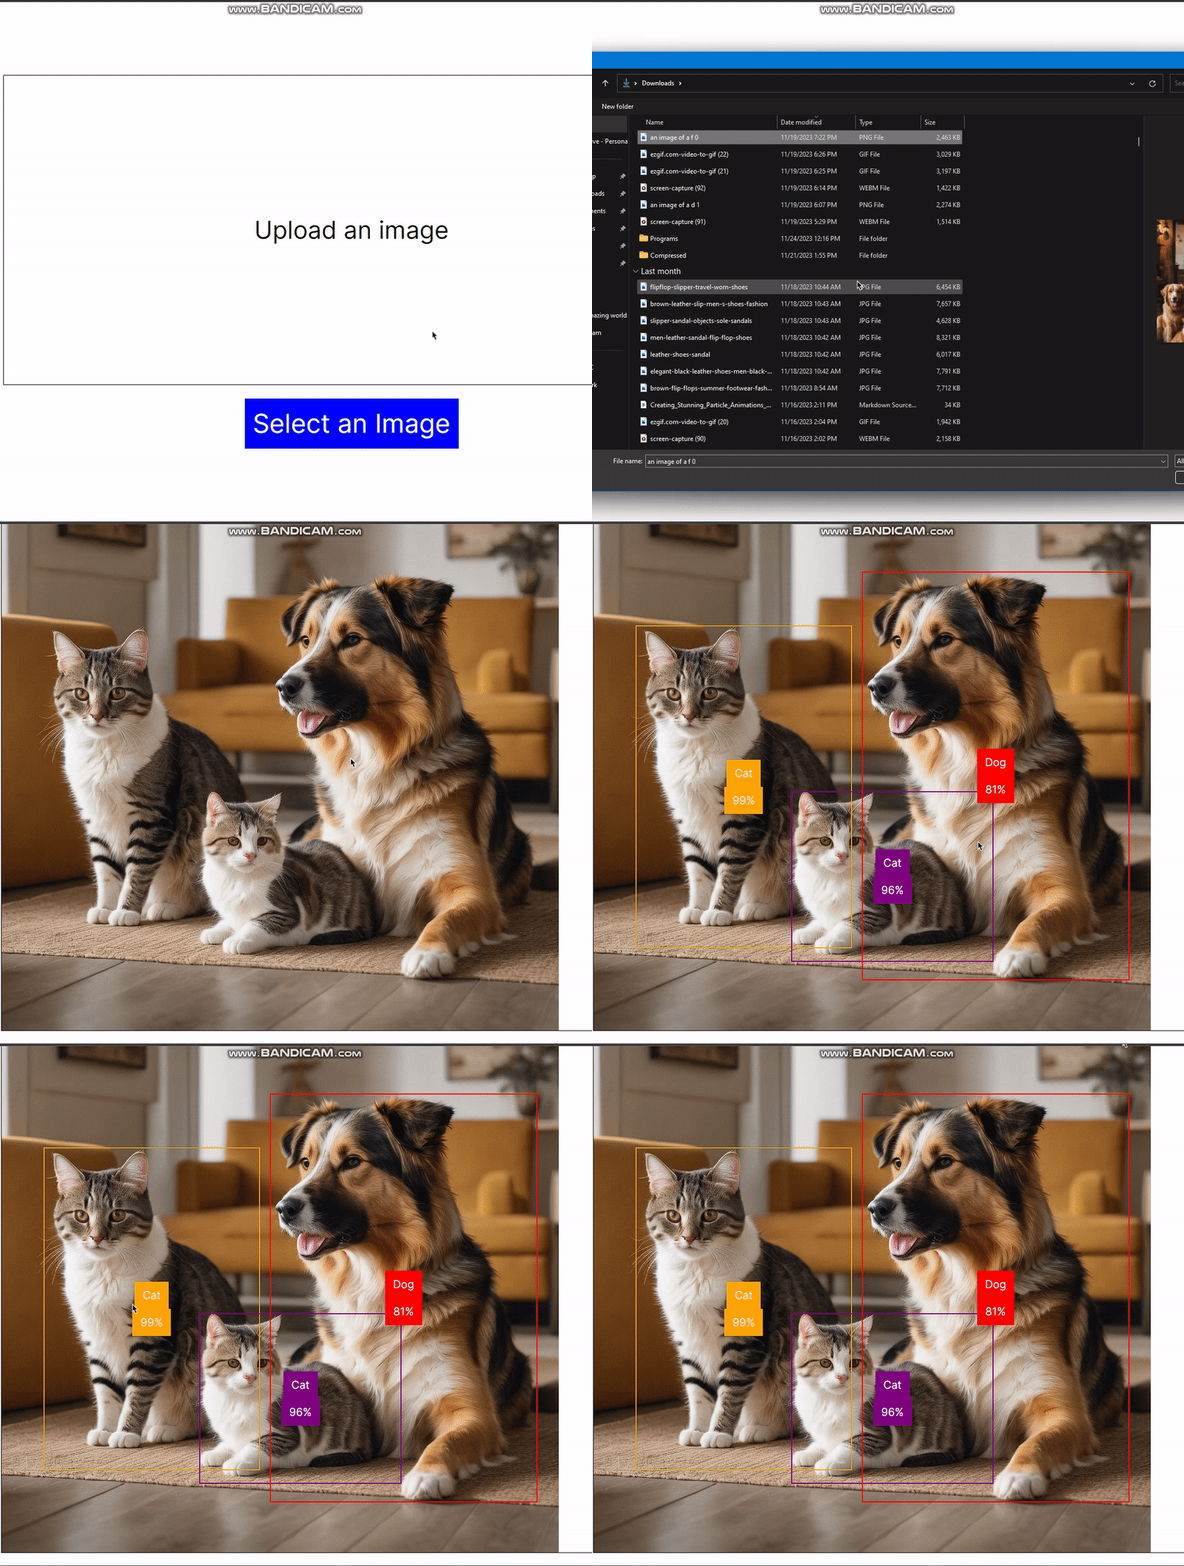
在瀏覽器中,我們可以看到以下結果:

在攝像頭上執行物體檢測器模型
在本節中,我們將建立一個元件,利用攝像頭的視覺資料執行物體檢測。為了訪問系統網路攝像頭,我們將安裝一個新的依賴項 React-webcam:
npm i react-webcam
使用 React-webcam 訪問可視資料
要使用 React-webcam 軟體包訪問系統網路攝像頭,請在 components 目錄下建立一個新檔案 CameraObjectDetector.jsx,並新增以下程式碼:
import React, { useRef, useState, useEffect } from "react";
import * as cocoSsd from "@tensorflow-models/coco-ssd";
import Webcam from "react-webcam";
const CameraObjectDetector = () => {
// Use useRef to handle webcam
const webcamRef = useRef(null);
// Use useRef to draw canvas
const canvasRef = useRef(null);
const [predictionsData, setPredictionsData] = useState([]);
const initCocoSsd = async () => {
const model = await cocoSsd.load();
// Function to use webcam
const detectCam = async (model) => {
webcamRef.current !== undefined &&
webcamRef.current !== null &&
webcamRef.current.video.readyState === 4
const video = webcamRef.current.video;
const videoWidth = webcamRef.current.video.videoWidth;
const videoHeight = webcamRef.current.video.videoHeight;
// Set video width and height
webcamRef.current.video.width = videoWidth;
webcamRef.current.video.height = videoHeight;
// Set the canvas width and height
canvasRef.current.width = videoWidth;
canvasRef.current.height = videoHeight;
// Detect objects in the image
const predictions = await model.detect(video);
console.log(predictions);
const ctx = canvasRef.current.getContext("2d");
// useEffect to handle cocoSsd
justifyContent: "center",
export default CameraObjectDetector;
"use client";
import React, { useRef, useState, useEffect } from "react";
import * as cocoSsd from "@tensorflow-models/coco-ssd";
import Webcam from "react-webcam";
const CameraObjectDetector = () => {
// Use useRef to handle webcam
const webcamRef = useRef(null);
// Use useRef to draw canvas
const canvasRef = useRef(null);
// Handle predictions
const [predictionsData, setPredictionsData] = useState([]);
//   Intialize cocoSsd
const initCocoSsd = async () => {
const model = await cocoSsd.load();
setInterval(() => {
detectCam(model);
}, 5);
};
// Function to use webcam
const detectCam = async (model) => {
if (
webcamRef.current !== undefined &&
webcamRef.current !== null &&
webcamRef.current.video.readyState === 4
) {
// Get video properties
const video = webcamRef.current.video;
const videoWidth = webcamRef.current.video.videoWidth;
const videoHeight = webcamRef.current.video.videoHeight;
// Set video width and height
webcamRef.current.video.width = videoWidth;
webcamRef.current.video.height = videoHeight;
// Set the canvas width and height
canvasRef.current.width = videoWidth;
canvasRef.current.height = videoHeight;
// Detect objects in the image
const predictions = await model.detect(video);
console.log(predictions);
// Draw canvas
const ctx = canvasRef.current.getContext("2d");
}
};
// useEffect to handle cocoSsd
useEffect(() => {
initCocoSsd();
}, []);
return (
<div
style={{
height: "100vh",
display: "flex",
alignItems: "center",
justifyContent: "center",
}}
>
<Webcam
ref={webcamRef}
style={{
position: "relative",
marginLeft: "auto",
marginRight: "auto",
left: 0,
right: 0,
textAlign: "center",
zindex: 9,
width: 640,
height: 480,
}}
/>
<canvas
ref={canvasRef}
style={{
position: "absolute",
marginLeft: "auto",
marginRight: "auto",
left: 0,
right: 0,
textAlign: "center",
zindex: 9,
width: 640,
height: 480,
}}
/>
</div>
);
};
export default CameraObjectDetector;
在上面的程式碼塊中,我們整合了 React-webcam,以返回檢測到的系統網路攝像頭捕獲的視訊片段。我們還將這段視訊傳遞給 cocoSsd 模型,並在此基礎上記錄預測結果。在接下來的章節中,我們將使用這些預測資料在 canvas 元素中建立邊界框。要載入該元件,請對 app/page.jsx 進行以下更改:
import CameraObjectDetector from "@/components/CameraObjectDetector";
import ImageDetector from "@/components/imagedetector";
export default function Home() {
{/* <ImageDetector /> */}
import CameraObjectDetector from "@/components/CameraObjectDetector";
import ImageDetector from "@/components/imagedetector";
export default function Home() {
return (
<div>
{/* <ImageDetector /> */}
<CameraObjectDetector />
</div>
);
}
import CameraObjectDetector from "@/components/CameraObjectDetector";
import ImageDetector from "@/components/imagedetector";
export default function Home() {
return (
<div>
{/* <ImageDetector /> */}
<CameraObjectDetector />
</div>
);
}
現在,如果我們執行應用程式,就會在瀏覽器中得到如下結果:

在控制檯中,我們可以看到 cocoSsd 的預測結果:

在上圖中,記錄的預測值包含 bbox, class, 和 score 值。
繪製邊界框
為了繪製邊框,我們將建立一個名為 drawBoundingBox 的函式,該函式將接收預測結果,並使用這些資料在視訊中的物件上構建矩形。
// An array of bounding box colors
const colors = ["blue", "green", "red", "purple", "orange"];
// Shuffle the array to randomize the color selection
function shuffleArray(array) {
for (let i = array.length - 1; i > 0; i--) {
const j = Math.floor(Math.random() * (i + 1));
[array[i], array[j]] = [array[j], array[i]];
// Counter to keep track of the next color to use
const drawBoundingBox = (predictions, ctx) => {
predictions.forEach((prediction) => {
const selectedColor = colors[colorCounter]; // Use the next color from the array
colorCounter = (colorCounter + 1) % colors.length; // Increment the counter
// Get prediction results
const [x, y, width, height] = prediction.bbox;
const text = prediction.class;
ctx.strokeStyle = selectedColor;
ctx.font = "40px Montserrat";
ctx.fillStyle = selectedColor;
// Draw rectangle and text
ctx.fillText(text, x, y);
ctx.rect(x, y, width, height);
// An array of bounding box colors
const colors = ["blue", "green", "red", "purple", "orange"];
// Shuffle the array to randomize the color selection
function shuffleArray(array) {
for (let i = array.length - 1; i > 0; i--) {
const j = Math.floor(Math.random() * (i + 1));
[array[i], array[j]] = [array[j], array[i]];
}
}
shuffleArray(colors);
// Counter to keep track of the next color to use
let colorCounter = 0;
// Draw bounding boxes
const drawBoundingBox = (predictions, ctx) => {
predictions.forEach((prediction) => {
const selectedColor = colors[colorCounter]; // Use the next color from the array
colorCounter = (colorCounter + 1) % colors.length; // Increment the counter
// Get prediction results
const [x, y, width, height] = prediction.bbox;
const text = prediction.class;
// Set styling
ctx.strokeStyle = selectedColor;
ctx.font = "40px Montserrat";
ctx.fillStyle = selectedColor;
// Draw rectangle and text
ctx.beginPath();
ctx.fillText(text, x, y);
ctx.rect(x, y, width, height);
ctx.stroke();
});
};
在上面的程式碼塊中,我們建立了一個顏色陣列,用於邊界框。通過 predictions 狀態,我們可以訪問 bbox 屬性來獲取物件的尺寸,並訪問 class 屬性來對顯示的物件進行分類。接下來,我們使用 canvas prop ctx 為邊界框繪製矩形和文字。
最後一步,我們將把畫布屬性和預測值傳遞給 detectCam 中的 drawBoundingBox 函式:
const detectCam = async (model) => {
webcamRef.current !== undefined &&
webcamRef.current !== null &&
webcamRef.current.video.readyState === 4
const ctx = canvasRef.current.getContext("2d");
drawBoundingBox(predictions, ctx);
const detectCam = async (model) => {
if (
webcamRef.current !== undefined &&
webcamRef.current !== null &&
webcamRef.current.video.readyState === 4
){
//... Former code here
// Draw canvas
const ctx = canvasRef.current.getContext("2d");
drawBoundingBox(predictions, ctx);
}
};
const detectCam = async (model) => {
if (
webcamRef.current !== undefined &&
webcamRef.current !== null &&
webcamRef.current.video.readyState === 4
){
//... Former code here
// Draw canvas
const ctx = canvasRef.current.getContext("2d");
drawBoundingBox(predictions, ctx);
}
};
現在,當我們執行應用程式時,就能在視訊上看到邊界框了:

小結
本文探討了如何在網路應用程式中整合物件檢測功能。我們首先介紹了物件檢測的概念及其有益的應用領域,最後使用 React.js 和 Tensorflow 在網路上建立了物件檢測的實現。
使用 Tensorflow 進行物件檢測的功能是無限的。它的其他自定義模型可以進一步探索這些功能,為監控、增強現實系統等現實世界場景建立互動和應用。


評論留言