
WooCommerce 垃圾訂單是機器人或欺詐者下的假訂單。這些訂單會擾亂您 WordPress 商店的資料庫,浪費您的時間,甚至導致退款造成經濟損失。與使用者註冊垃圾郵件不同,這些垃圾訂單會直接影響您的銷售和運營。
這個問題通常源於薄弱的安全設定,如開放式訪客結賬、缺乏殭屍保護和驗證不力。
由於 WooCommerce 沒有內建防止垃圾訂單的工具,因此您需要採取額外的措施來阻止它們。讓我們直接進入阻止垃圾訂單的最佳方法。
1. 設定Cloudflare:您的第一道防線
說到阻止 WooCommerce 訂單垃圾郵件,Cloudflare 是您最有效的工具,因為它可以在垃圾郵件到達您的網站之前就將其攔截。
其他解決方案(如驗證碼、反垃圾郵件外掛和欺詐預防工具)的工作原理是在機器人與您的商店互動後過濾垃圾郵件,而 Cloudflare 則在邊緣攔截不良流量,防止機器人到達您的結賬和註冊頁面。
Cloudflare 不僅僅是一個內容分發網路(CDN),它還是一個安全強國。它提供打擊殭屍模式、Web 應用程式防火牆(WAF)規則和 IP 阻斷功能,所有這些功能都能減輕您商店的負載,保護您的資源,防止欺詐性訂單漏網。
如何為WooCommerce設定Cloudflare垃圾郵件防護功能
第一步是註冊一個免費的 Cloudflare 賬戶(如果您還沒有)。登入後,您將進入 Cloudflare 面板。
首先,點選“+ Add”下拉選單,點選“Existing domain”,然後輸入您 WooCommerce 商店的域。這樣,Cloudflare 就可以管理流量併為您的網站應用安全規則。
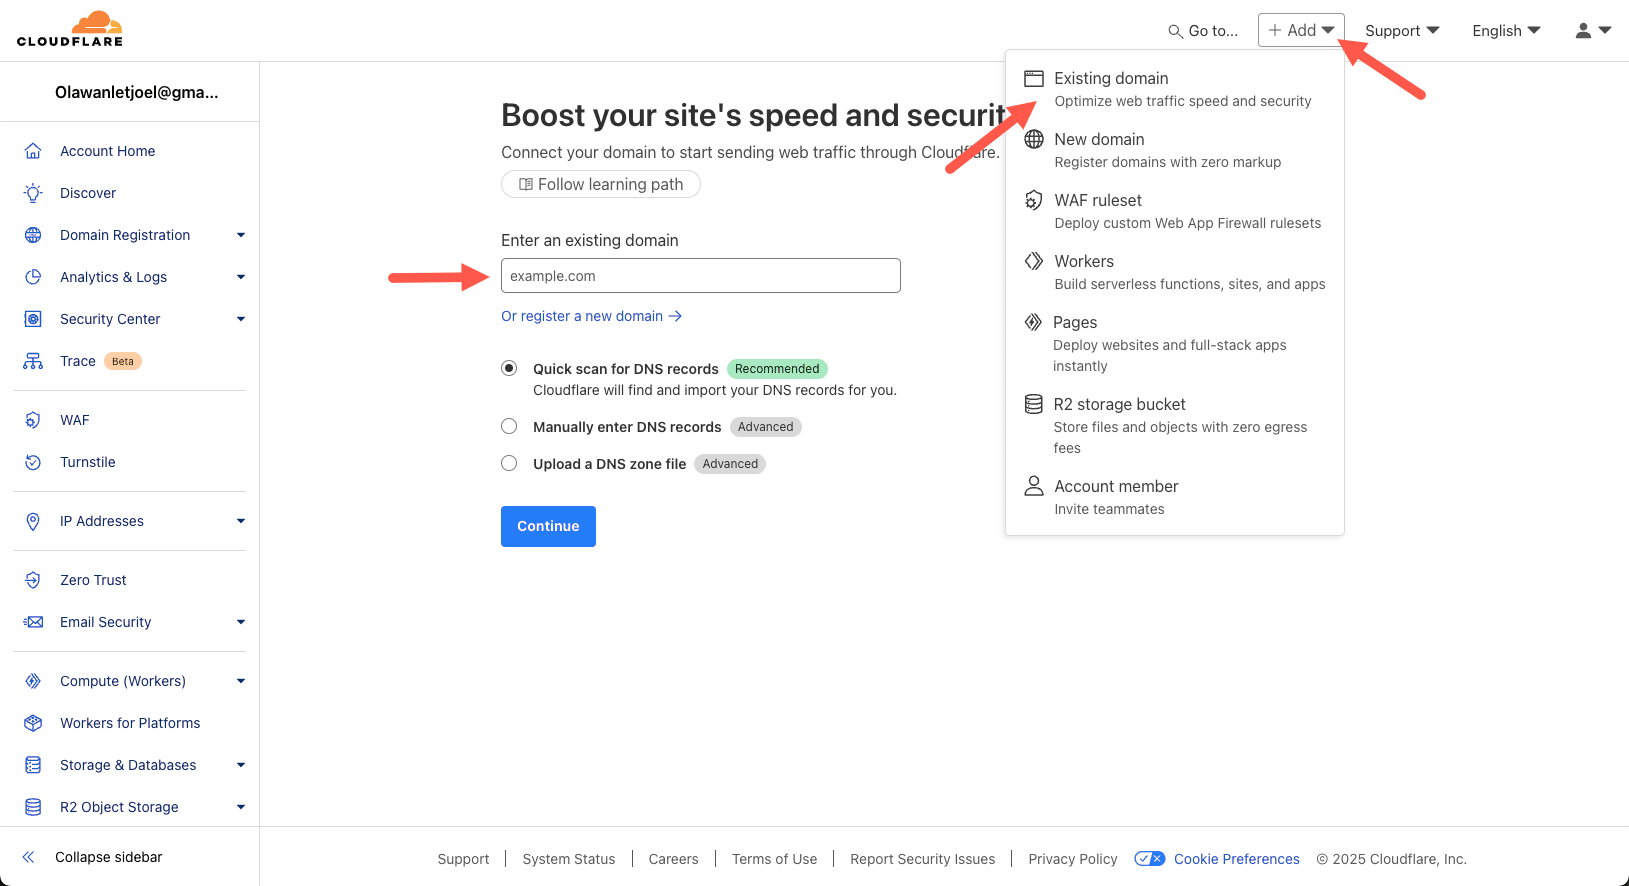
將您的 WooCommerce 商店新增到 Cloudflare 以啟用安全功能。
輸入域名後,Cloudflare 會要求您選擇一個計劃。免費計劃足以滿足大多數 WooCommerce 商店的需求,因為該計劃包括 Bot Fight Mode、基本 DDoS 保護和安全規則。選擇 Free Plan,然後點選 Continue。
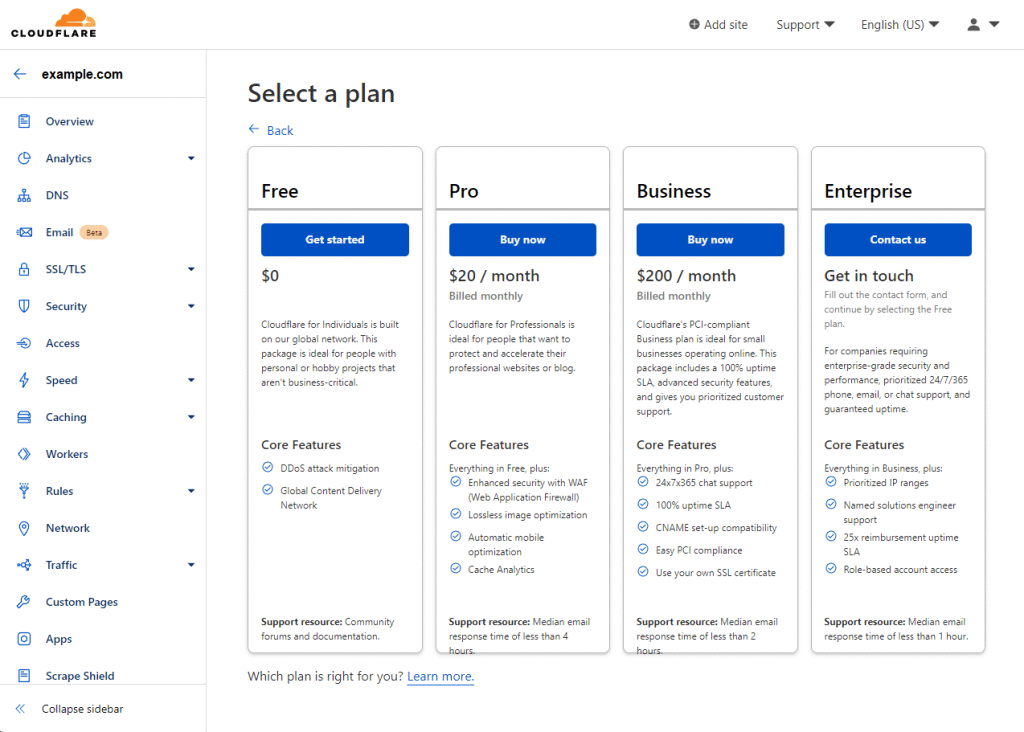
選擇 Cloudflare 的基本安全和殭屍保護免費計劃。
接下來,Cloudflare 會掃描您當前的 DNS 記錄。您會看到從現有託管提供商處自動提取的記錄列表。確保您的主域名和子域被正確列出。單擊“Continue”繼續。
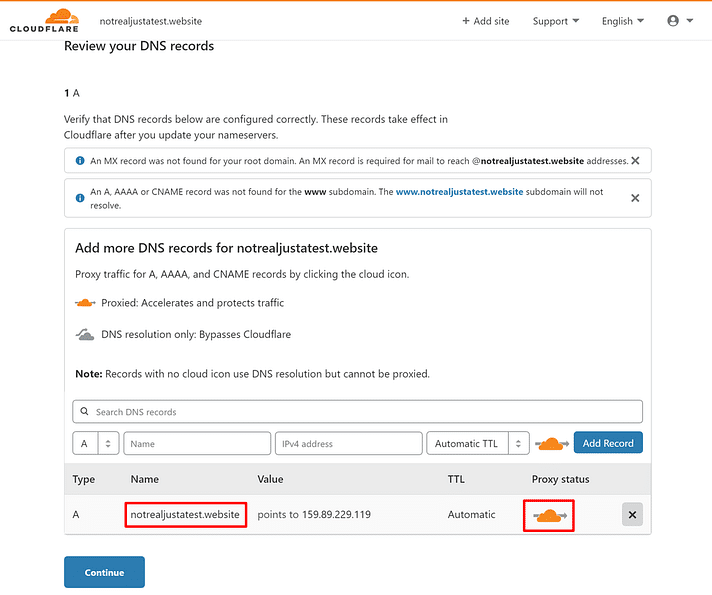
在繼續之前驗證 Cloudflare 中的 DNS 記錄。
Cloudflare 將為您提供新的 nameservers。要啟用 Cloudflare 的安全功能,您需要在域名註冊商處更新域名伺服器。
更新域名伺服器後,返回 Cloudflare 並單擊“Done”、“Check Nameservers”。Cloudflare 可能需要幾分鐘時間來檢測更改。一旦您的網站在 Cloudflare 上啟用,您就可以設定殭屍保護規則。
啟用 Bot Fight Mode 阻止惡意殭屍
Cloudflare 的內建安全功能之一是 Bot Fight Mode,它可以在已知的惡意殭屍與您的 WooCommerce 商店互動之前阻止它們。
要啟用該功能,請在 Cloudflare 儀表板中導航至 Security > Bots。找到 Bot Fight Mode 並將其切換為“ON”。
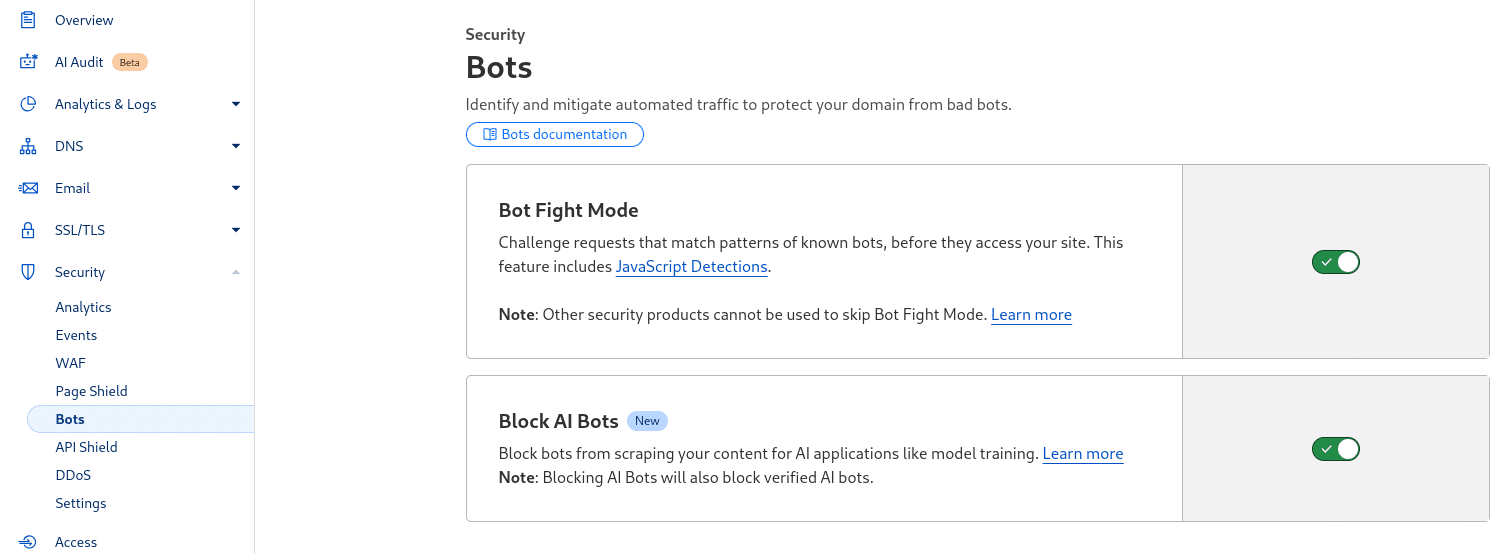
啟用 Cloudflare Bot Fight Mode 可阻止惡意機器人。
這將防止機器人訪問您的結賬和註冊頁面,從而立即幫助減少自動垃圾訂單。
在啟用“Bot Fight Mode”的同時,最好也開啟 “阻止人工智慧機器人”(Block AI Bots),它就在旁邊。我們的支援工程師指出,雖然 WooCommerce 垃圾郵件防範嚴格意義上並不需要這一設定,但它可以幫助解決人工智慧機器人對你的網站進行攻擊所造成的效能峰值問題。這些機器人通常會傳送大量未快取請求,從而導致網站執行速度減慢。啟用阻止人工智慧機器人功能後,您就可以減少與垃圾郵件相關的流量,避免伺服器承受不必要的負載,從而保持 WooCommerce 商店的平穩執行。
為WooCommerce垃圾郵件保護建立自定義WAF規則
Cloudflare 的 WAF 允許您設定規則,在垃圾流量到達 WooCommerce 商店之前將其過濾掉。我們的支援工程師分享了兩個有用的規則示例:一個是在關鍵頁面上挑戰可疑訪客,另一個是阻止來自特定國家的流量。
對於結賬和註冊保護,規則應同時針對 URI 路徑和 URL 查詢字串。在 Cloudflare 的 Security > WAF 中,建立一個名為WooCommerce Spam Protection 的規則。設定 URI 路徑包含 /checkout/ 和 /my-account/,同時新增 URL 查詢字串包含 wc-ajax=checkout 。操作應為託管挑戰,這將迫使可疑使用者在繼續操作前驗證自己是否為人類。
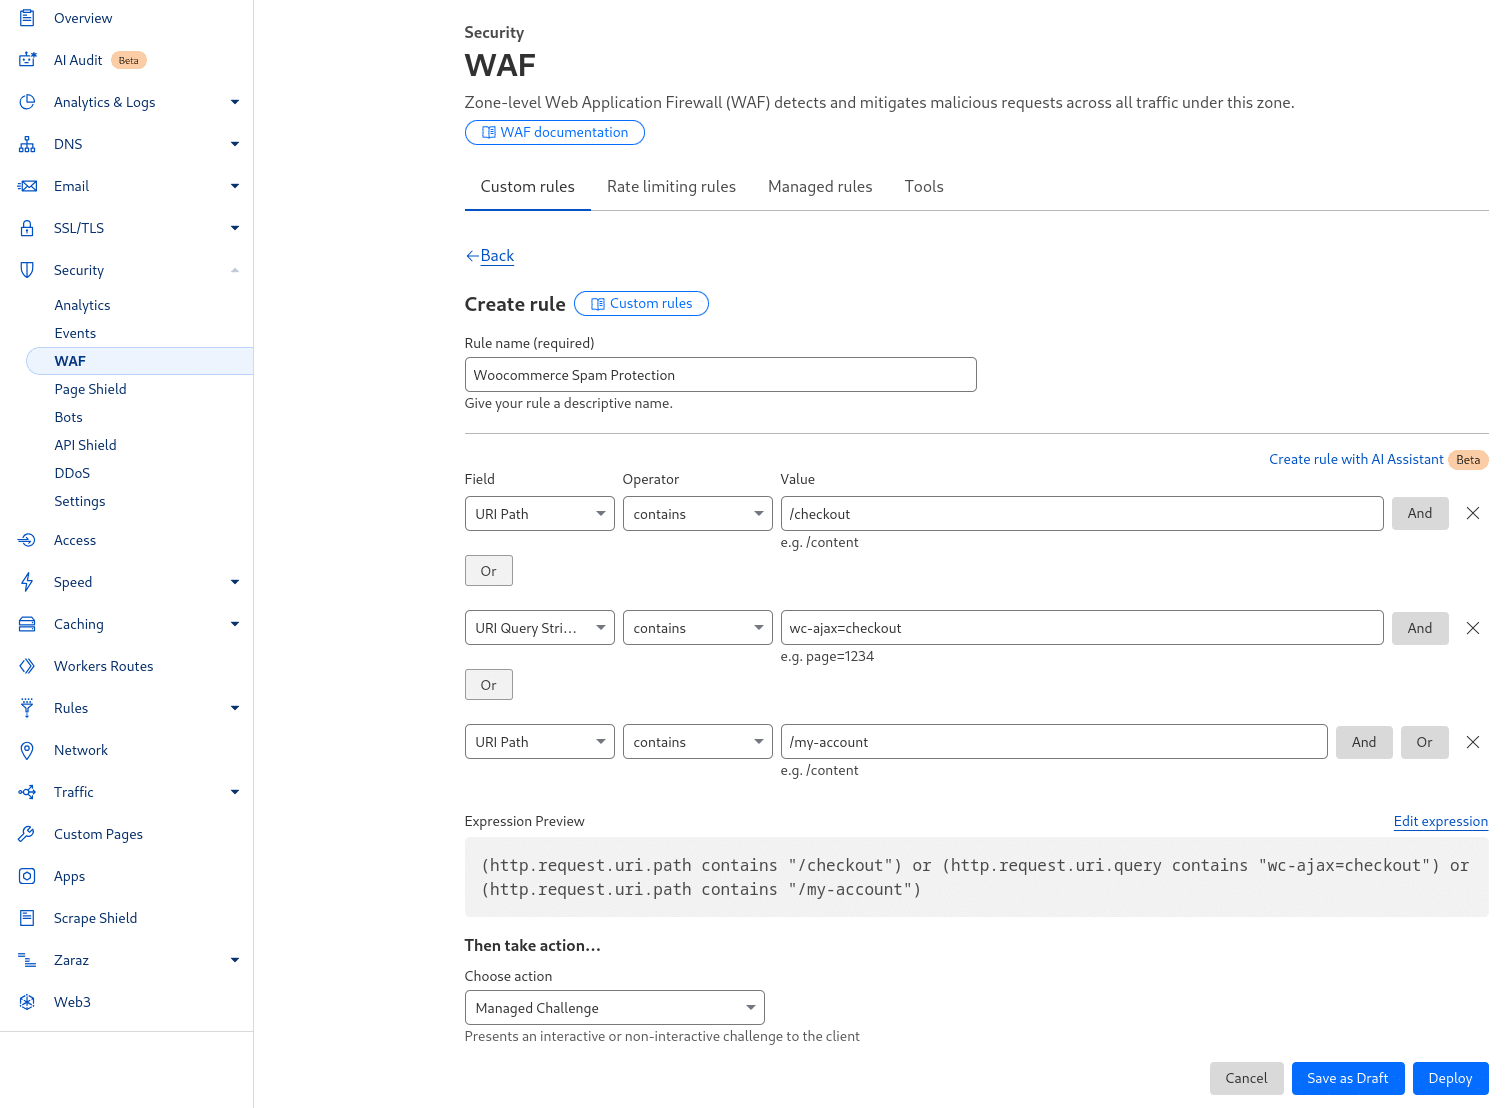
建立 Cloudflare WAF 規則以保護 WooCommerce 結賬。
對於基於國家的阻止,在 Security > WAF 中建立一個單獨的規則,並將 Country 欄位設定為不等於 United States, Canada, 和 United Kingdom (或您的商店支援的任何國家)。將操作設定為 Block,確保只有來自批准地點的訪客才能訪問您的網站。
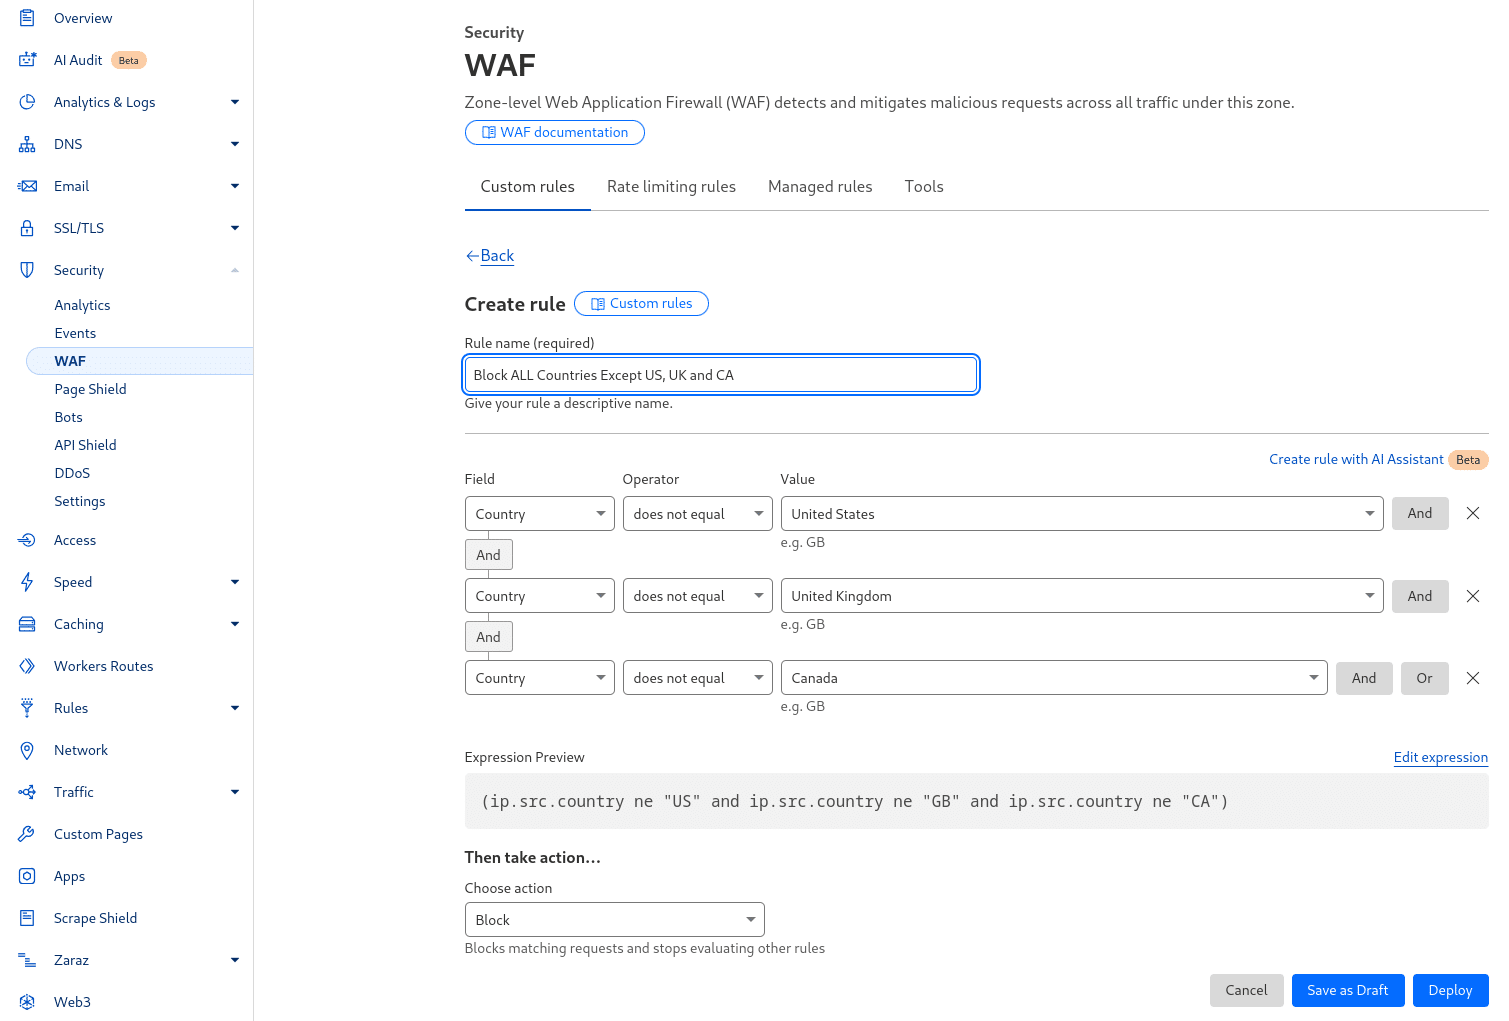
在 Cloudflare WAF 設定中阻止高風險國家。
這些規則有助於防止來自高風險地區的自動垃圾郵件機器人和欺詐性訂單,同時允許合法客戶訪問。
完成後,單擊“Deploy Rule”。現在,Cloudflare 將對這些頁面上的可疑流量提出質疑,阻止自動垃圾郵件機器人,同時允許真實客戶通過。
雖然 Cloudflare 是最好的第一道防線,但您可能仍然需要在網站層面進行額外的過濾。當您需要分析 WooCommerce 本身的資料時,外掛就會派上用場,例如
- 在阻止訂單之前檢查客戶詳細資訊。
- 根據電子郵件域名或 IP 歷史記錄過濾垃圾郵件註冊。
- 防止假訂單通過殭屍保護。
我們的支援工程師建議儘可能使用 Cloudflare 在垃圾郵件到達網站之前將其攔截。不過,如果僅使用 Cloudflare 還不夠,或者您更願意直接在 WordPress 中處理垃圾郵件過濾,這裡還有一些其他選項可幫助您防止 WooCommerce 垃圾訂單。
2. 在結賬和登錄檔單中新增驗證碼
在 WooCommerce 商店的關鍵表單中新增 CAPTCHA(驗證碼)是阻止垃圾訂單最簡單有效的方法之一。
CAPTCHA 是“區分計算機和人類的完全自動化公共圖靈測試(Completely Automated Public Turing test to tell Computers and Humans Apart)”的縮寫。這是一種安全措施,有助於阻止機器人和垃圾郵件傳送者訪問您的網站。CAPTCHA 通過一些簡單的任務來挑戰使用者,如選擇圖片、勾選方框或輸入扭曲的文字,這些任務對人類來說很容易,但對機器人來說卻很難解決。
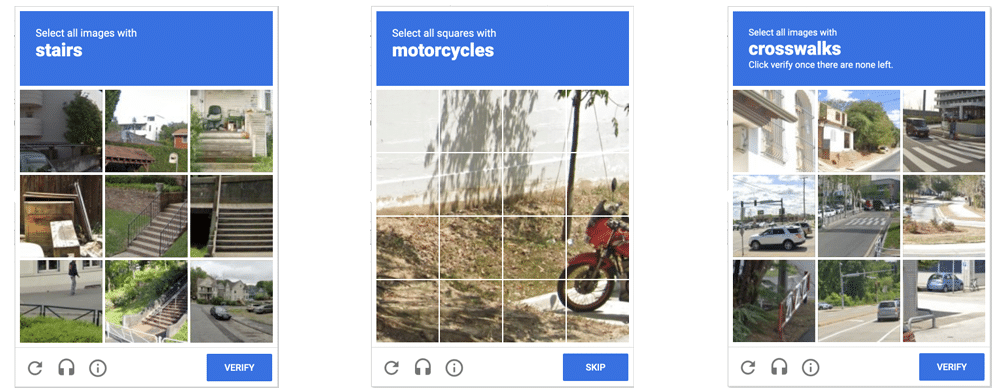
使用驗證碼防止機器人提交虛假訂單。(來源:Arstechnica.com)
通過這種方式,驗證碼可以防止自動機器人提交虛假訂單,同時讓真正的客戶順利完成購買。
為了有效防止垃圾訂單,您應該在以下方面新增驗證碼:
- 結賬表單– 阻止機器人提交虛假訂單。
- 登錄檔單– 防止建立垃圾客戶賬戶。
- 登入表單– 阻止機器人試圖訪問賬戶的暴力破解攻擊。
有幾款外掛可以讓您輕鬆地將驗證碼整合到 WooCommerce 網站中,但我們建議您使用 Simple Cloudflare Turnstile 或 Advanced Google reCAPTCHA。您只需實施其中一種即可。下面,我們將向您介紹這兩個選項。
選項 1:使用簡單的Cloudflare Turnstile
為驗證碼保護設定 Cloudflare Turnstile。
Cloudflare Turnstile 是 Google reCAPTCHA 的隱私友好型替代品。它能自動驗證使用者,無需使用者解謎,使結賬過程更順暢。
要在 WordPress 網站中使用 Cloudflare Turnstile,請訪問 Cloudflare 網站 並註冊或登入。登入後,您將進入 Cloudflare 儀表板。在儀表板上,查詢 Turnstile。如果這是您第一次使用,請單擊“Add Widget”按鈕。
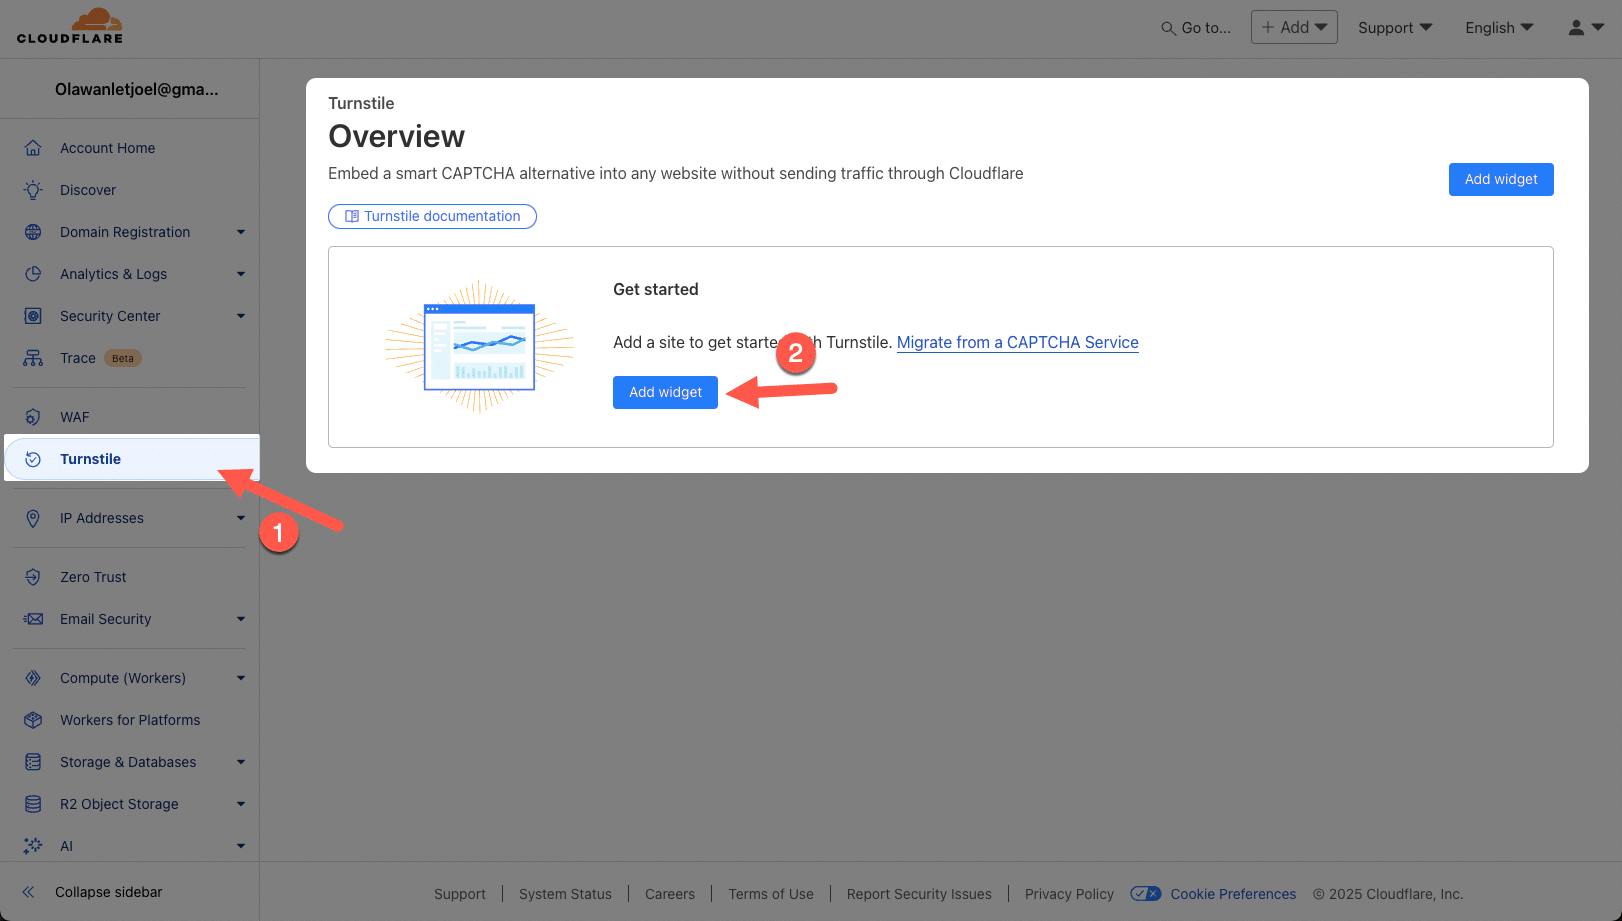
為 WooCommerce 安全建立 Cloudflare Turnstile 小工具。
接下來,為您的小工具命名(例如,WooCommerce 結賬驗證碼),以便日後識別。然後,點選 Add Hostnames,新增您的網站。
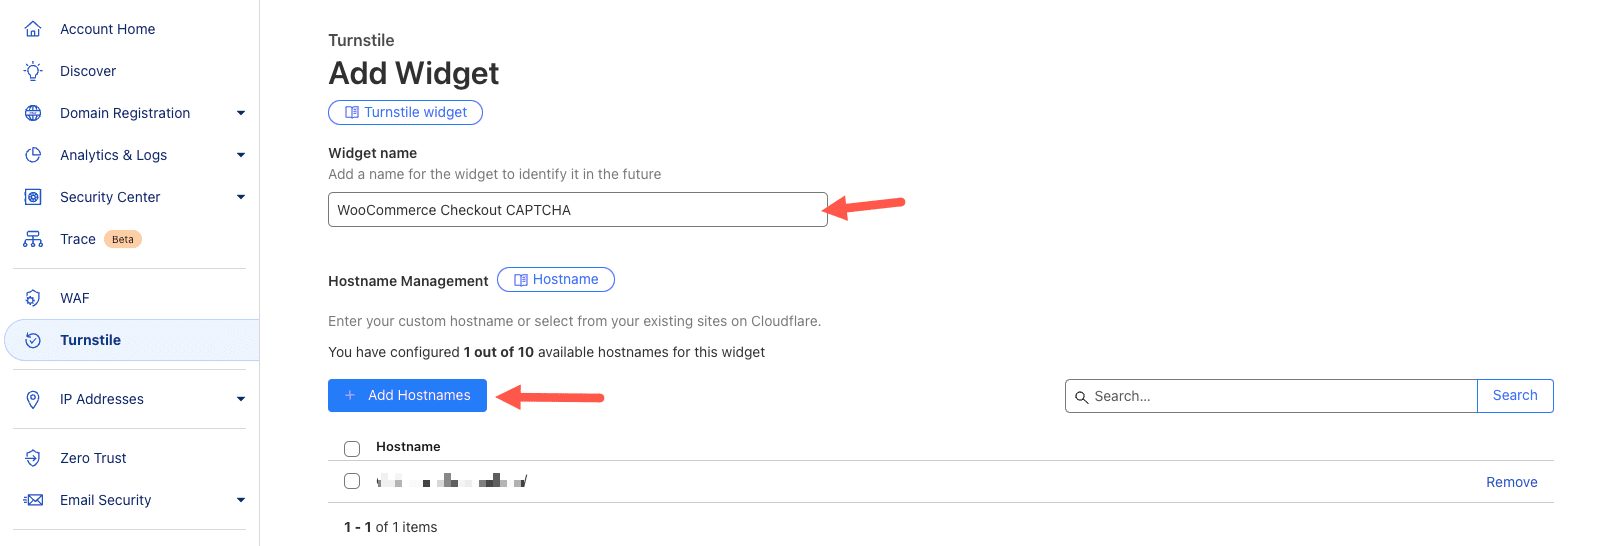
命名 Cloudflare Turnstile 小工具並新增您的域名。
現在向下滾動選擇 Managed 小工具模式,然後點選 Create。
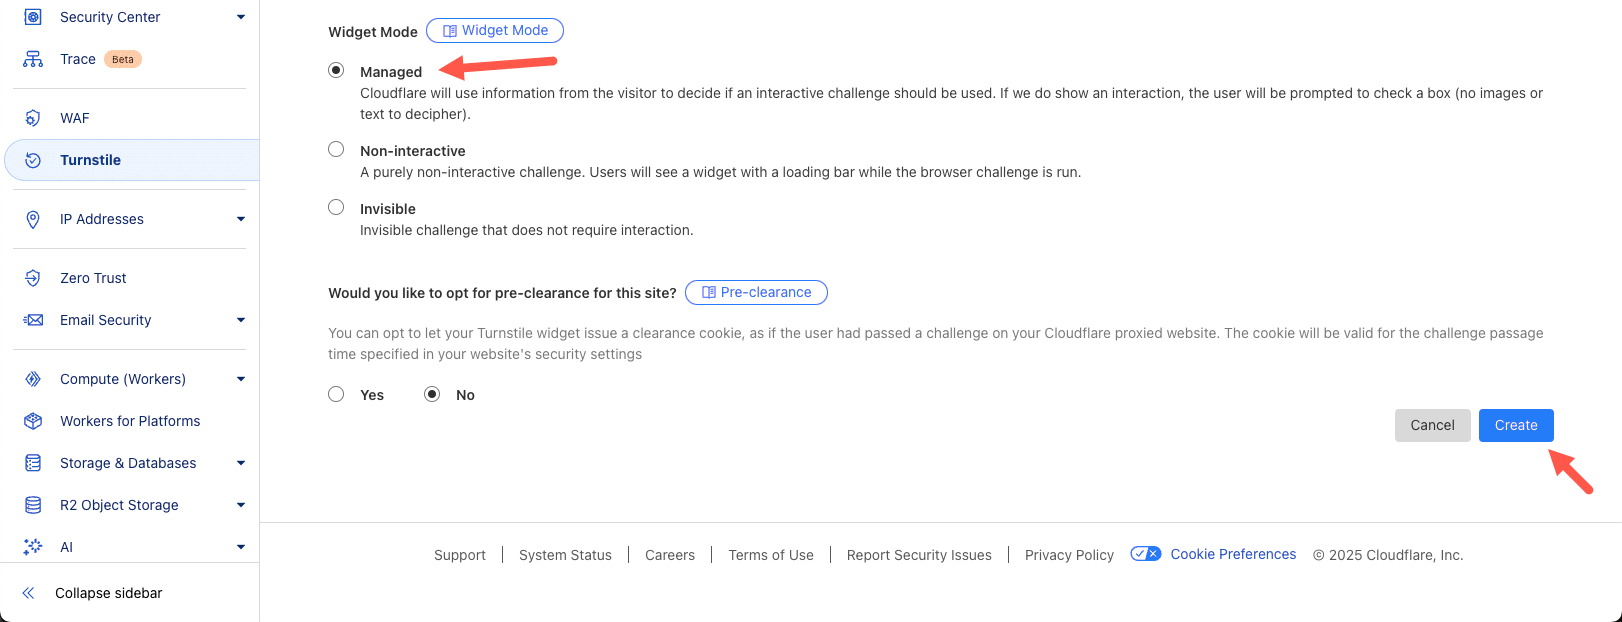
在 Cloudflare Turnstile 中選擇託管部件模式。
建立小部件後,Cloudflare 將生成 API 金鑰,您需要在 WordPress 儀表板中使用這些金鑰。從該頁面複製 Site Key 和 Secret Key。
有幾款外掛可以在 WordPress 中新增驗證碼,但 Simple Cloudflare Turnstile 是一款免費外掛,強烈推薦使用。
要使用它,請轉到外掛>安裝新外掛 。在搜尋欄中輸入 Simple Cloudflare Turnstile 。然後,安裝並啟用該外掛。
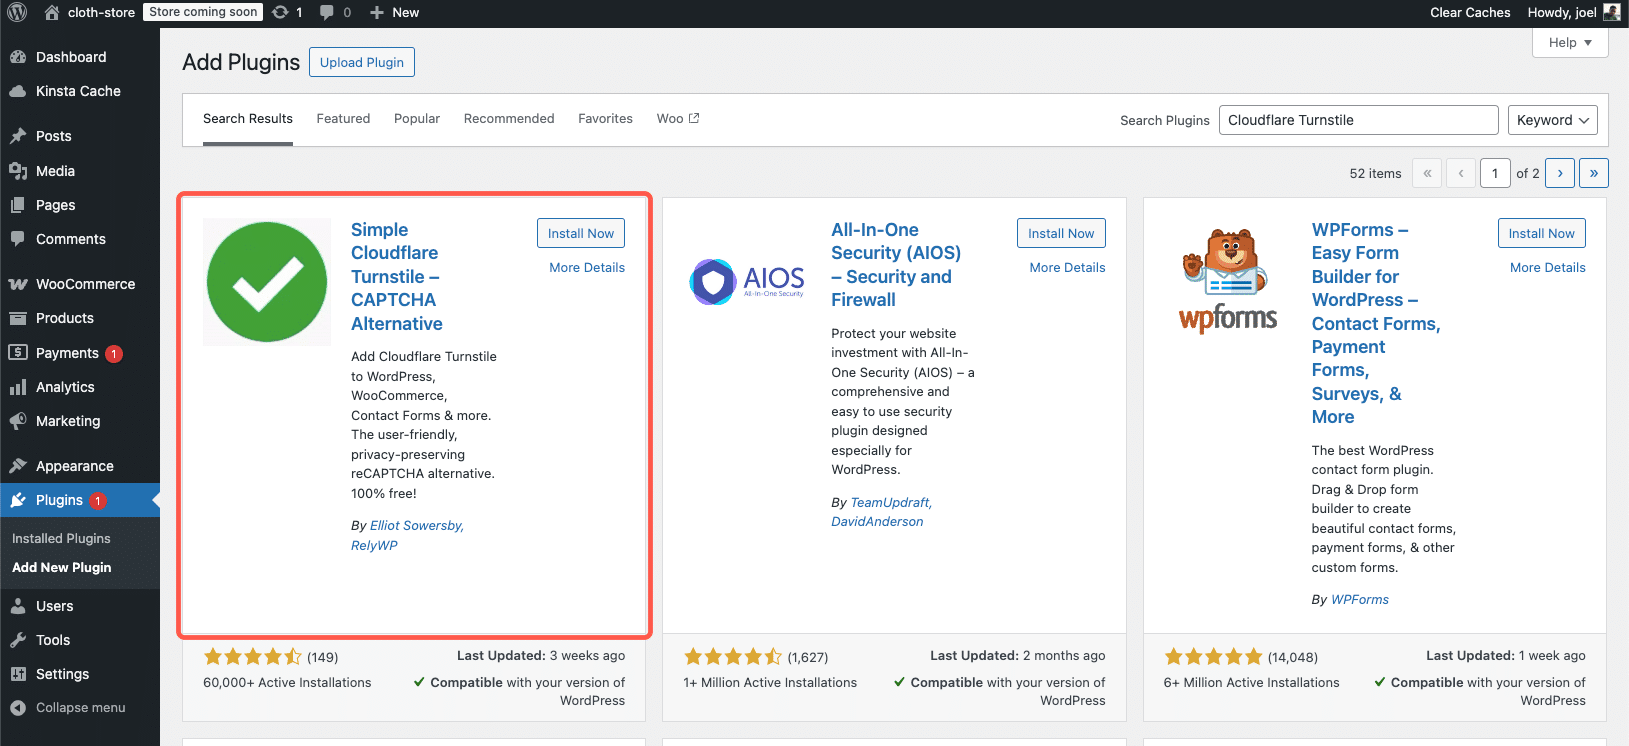
在 WordPress 中安裝 Simple Cloudflare Turnstile 外掛。
啟用外掛後,進入“設定” > “Cloudflare Turnstile”。將之前複製的 Site Key 和 Secret Key 貼上到相應的欄位中。
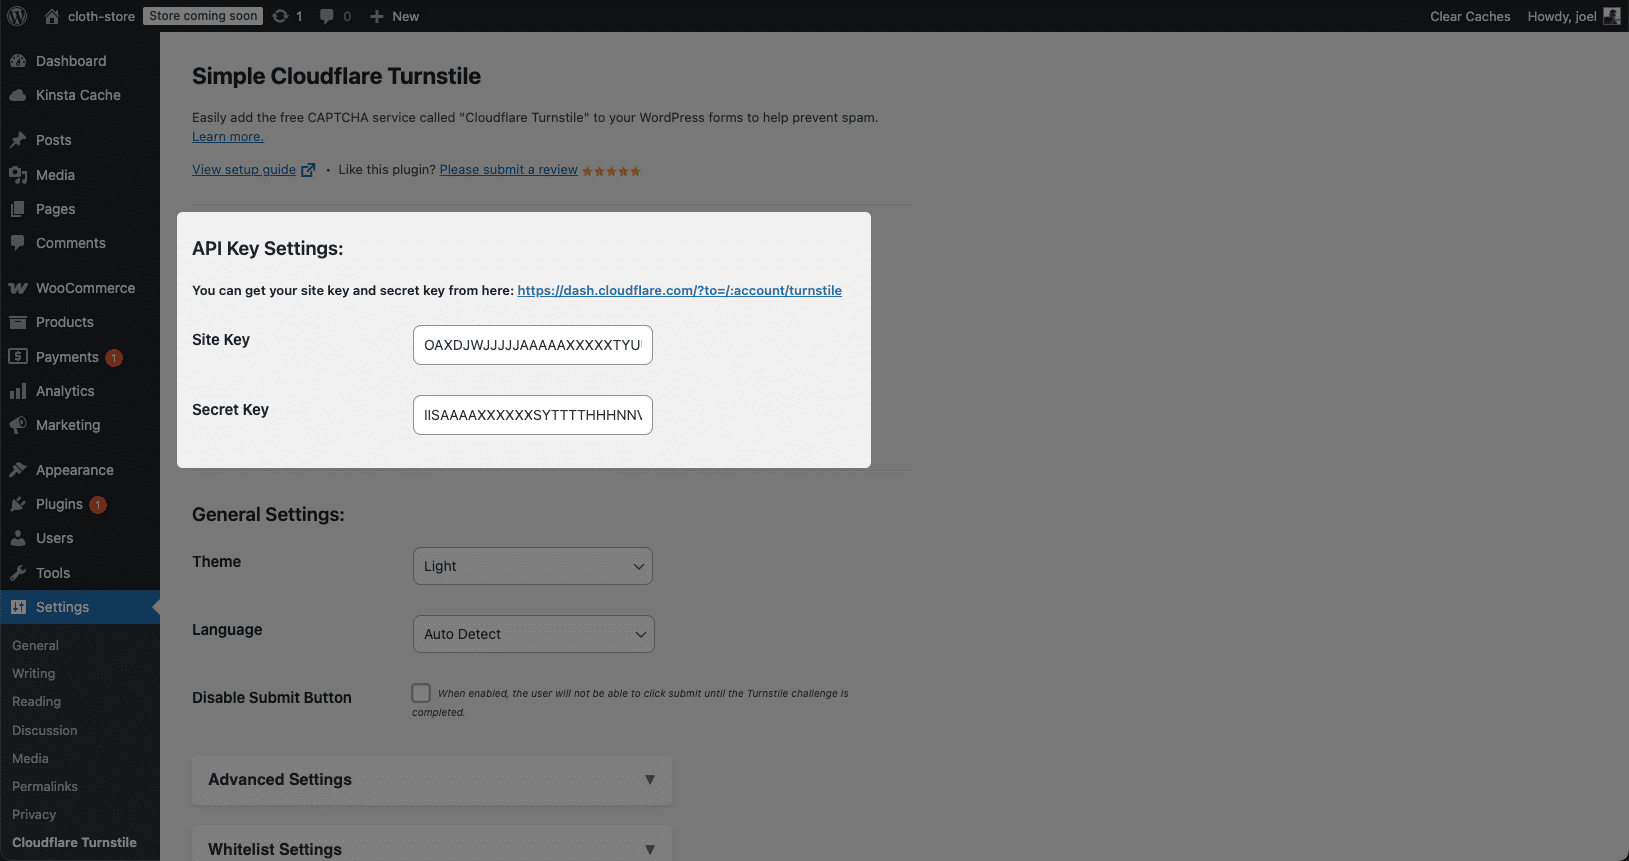
在 WordPress 中配置 Cloudflare Turnstile 外掛。
現在向下滾動並選中要啟用驗證碼的表單。如下圖所示,選擇 WooCommerce Login, Registration, 和 Checkout。
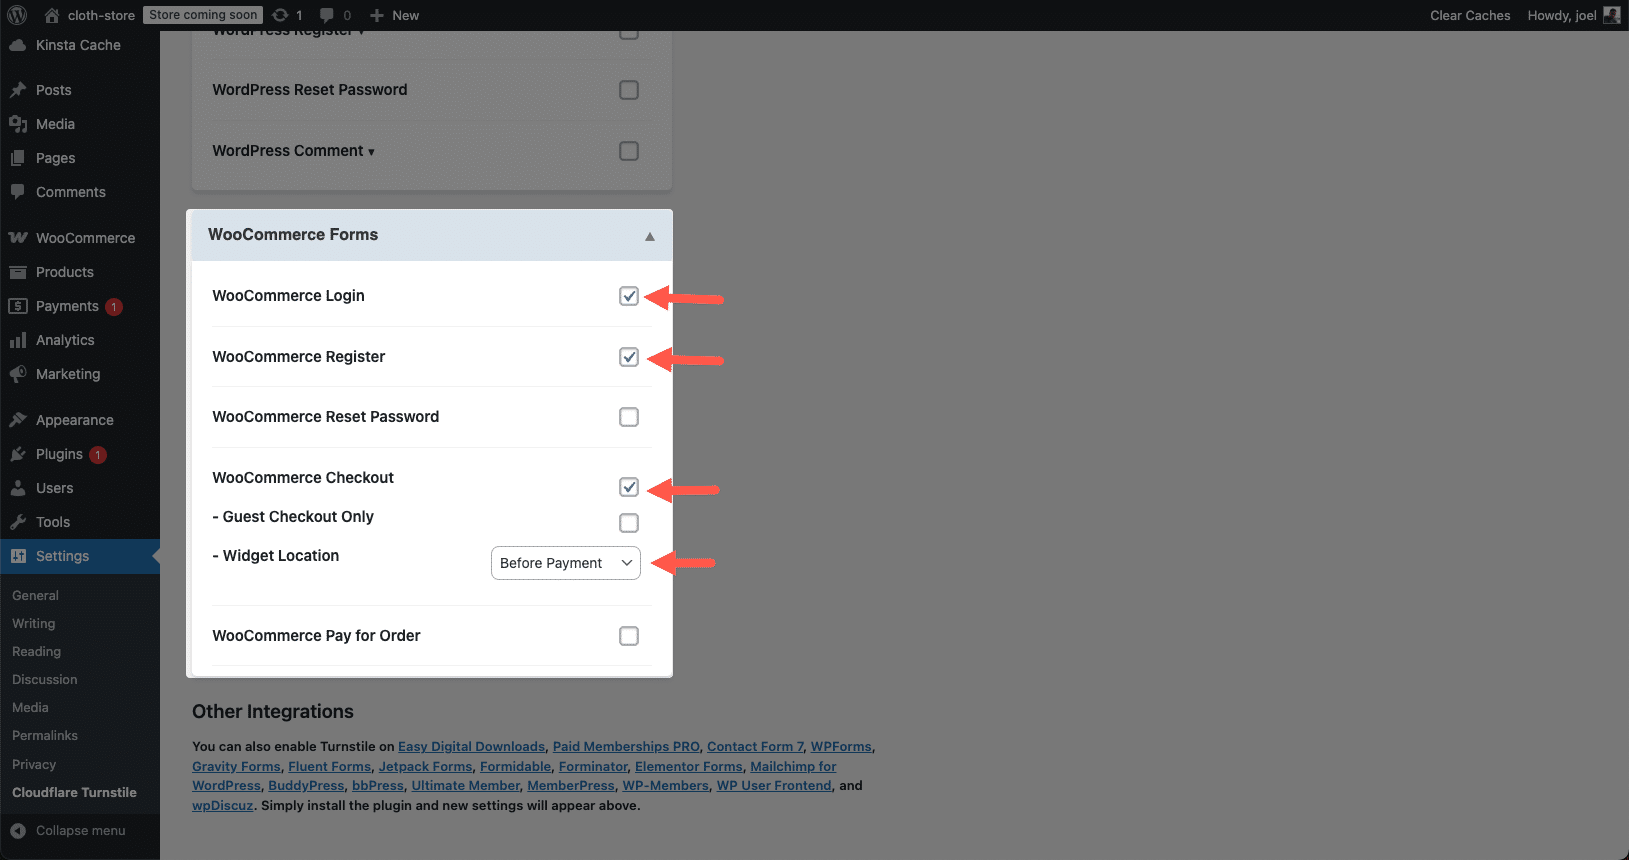
在 WooCommerce 表單中啟用 Cloudflare Turnstile CAPTCHA。
單擊“Save Changes”,大功告成。開啟 WooCommerce 結賬頁面,您會發現驗證碼挑戰出現了。
選項 2:使用高階Google驗證碼
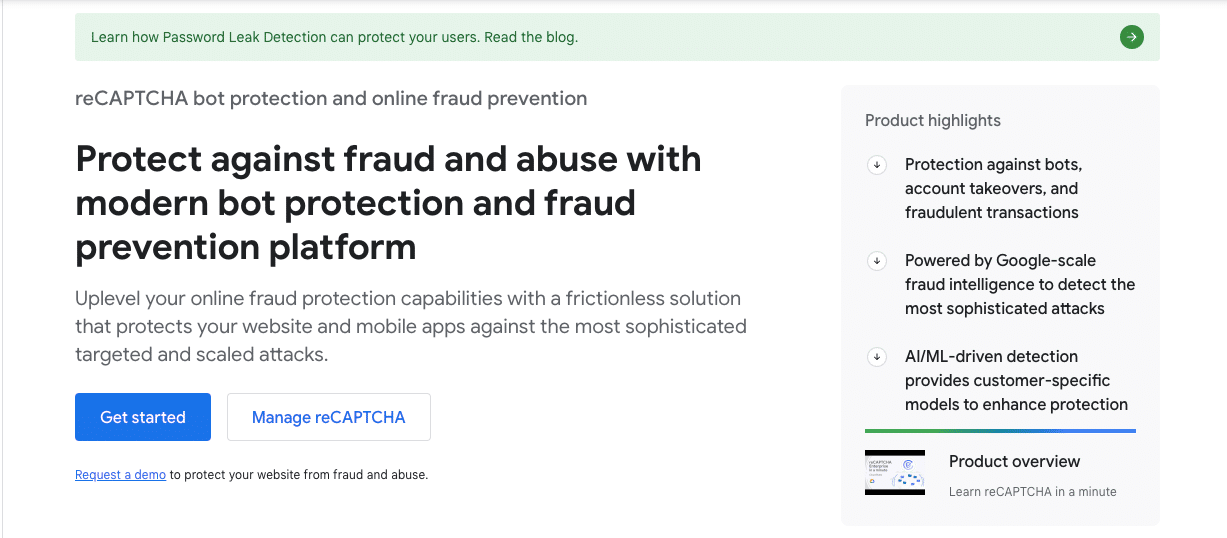
為 WooCommerce 安全設定 Google 驗證碼。
Google 驗證碼是使用最廣泛的垃圾郵件防護工具之一。它提供 reCAPTCHA v2(覈取方塊驗證)和 reCAPTCHA v3(後臺驗證)。
要開始使用 Google reCAPTCHA,請登入您的 Google 賬戶。登入後,進入 reCAPTCHA 產品頁面並點選“Get Started”。這將帶您進入管理區,您可以點選 + Create 來註冊一個新網站。輸入標籤以識別驗證碼,然後選擇挑戰型別。在本指南中,請選擇 reCAPTCHA v2,並選擇“I’m not a robot”覈取方塊選項。
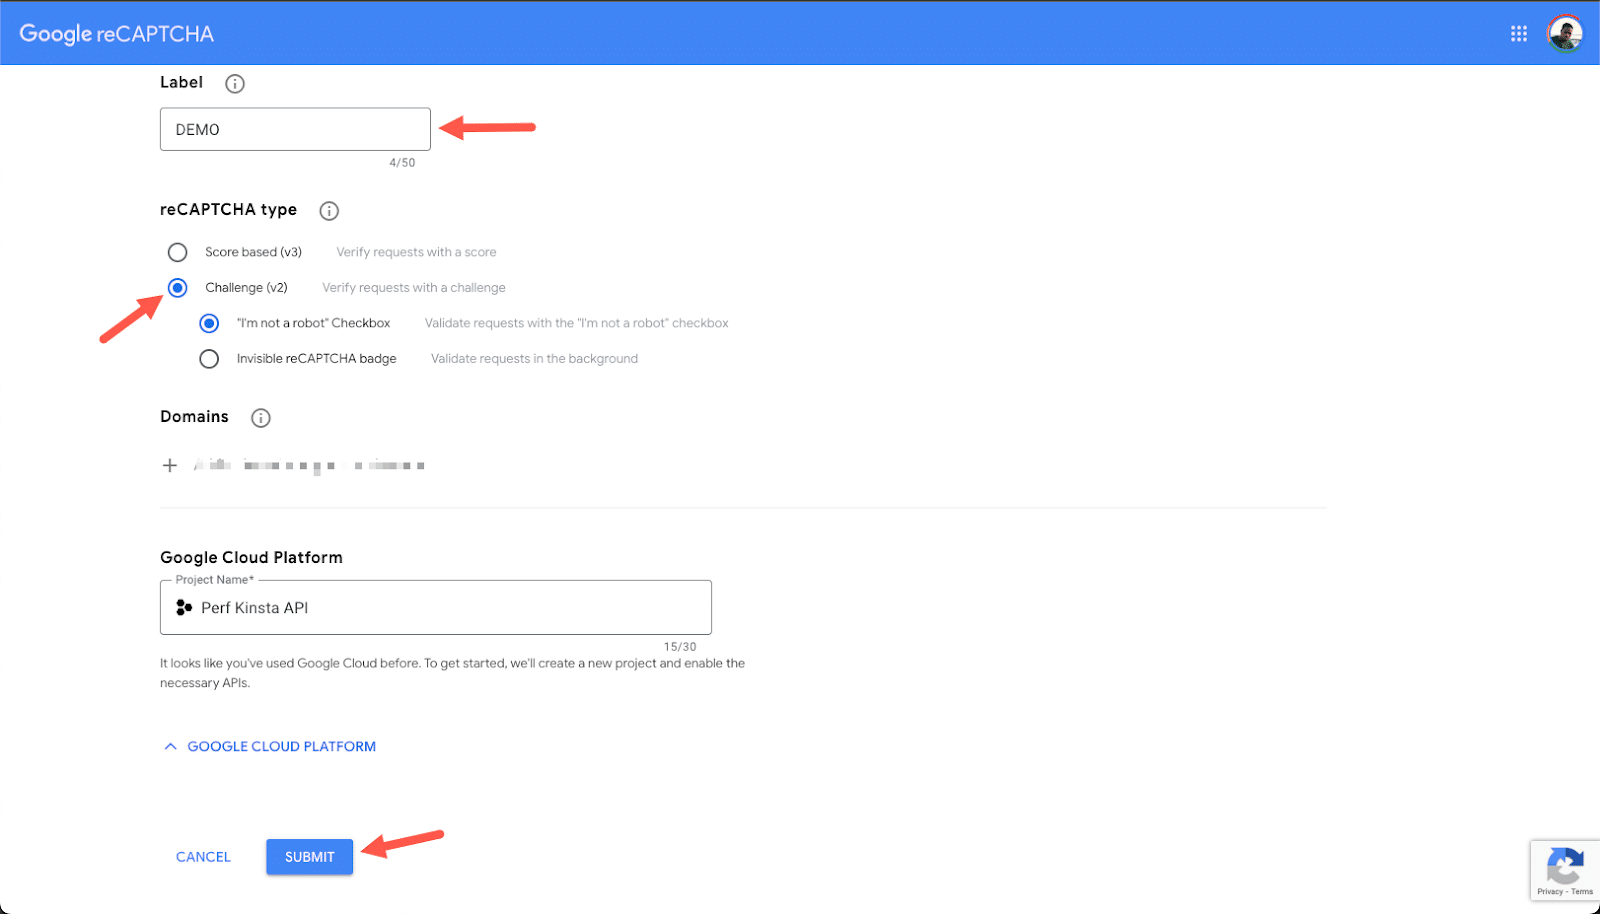
選擇帶有“I’m not a robot”覈取方塊的 reCAPTCHA v2,以確保 WooCommerce 的安全性。
選擇挑戰型別後,新增不帶任何字首的網站域名(如example.com )。然後,點選 Submit 並複製為您生成的 Site Key 和 Secret Key。
接下來,返回 WordPress 控制面板。轉到外掛>安裝新外掛,搜尋高階谷歌驗證碼,然後點選 立即安裝並啟用。
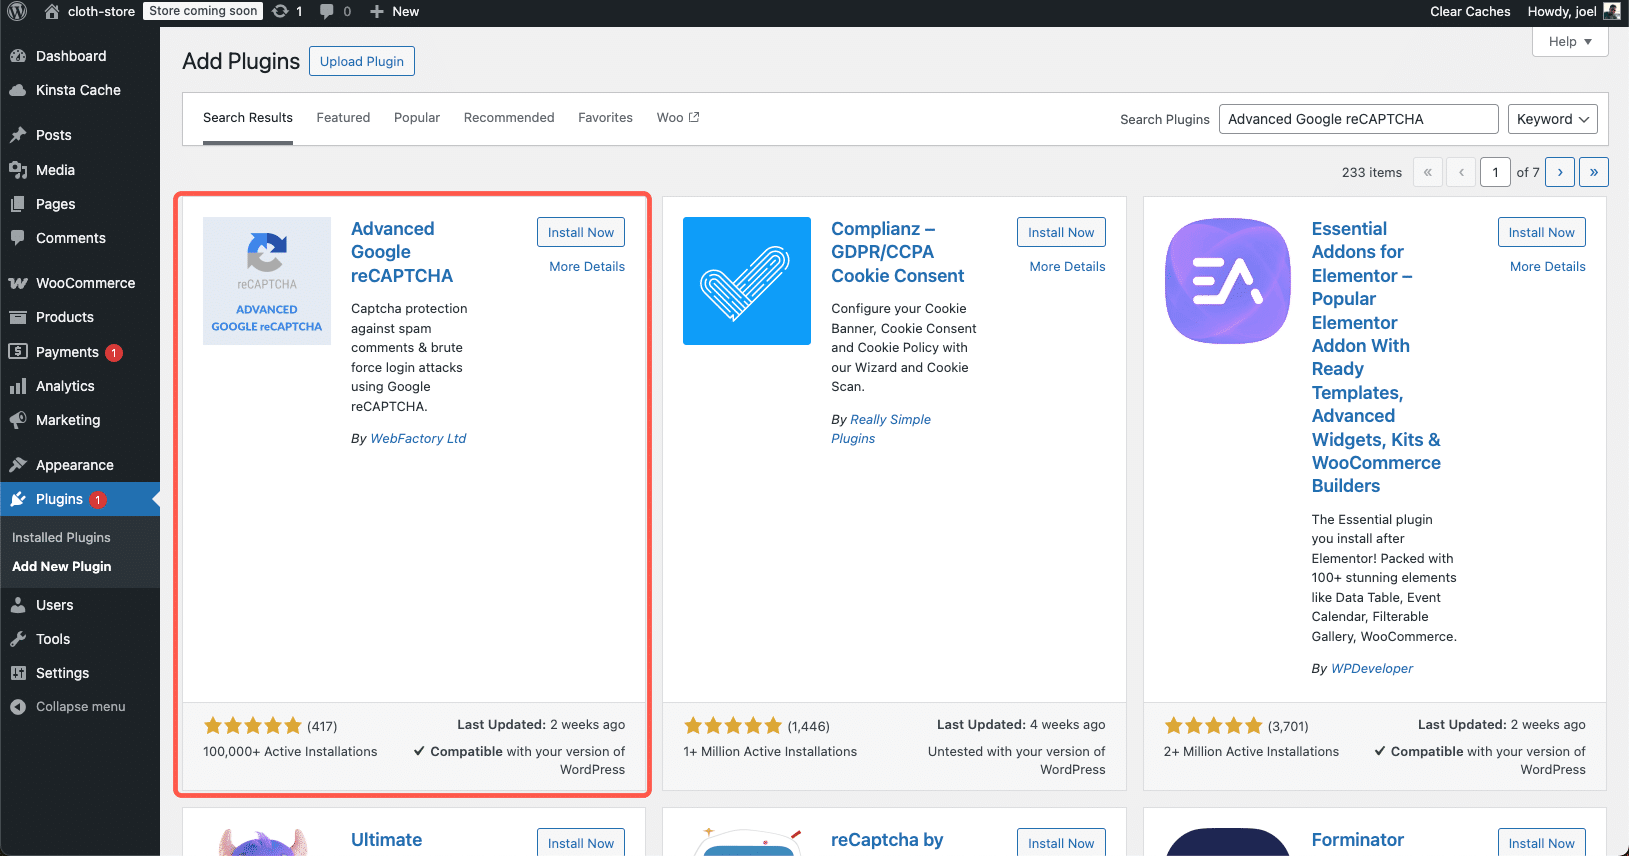
在 WordPress 中安裝 Advanced Google reCAPTCHA 外掛。
啟用後,導航至設定>Advanced Google reCAPTCHA。選擇驗證碼,然後將來自 Google 的 Site Key 和 Secret Key 貼上到相應欄位。
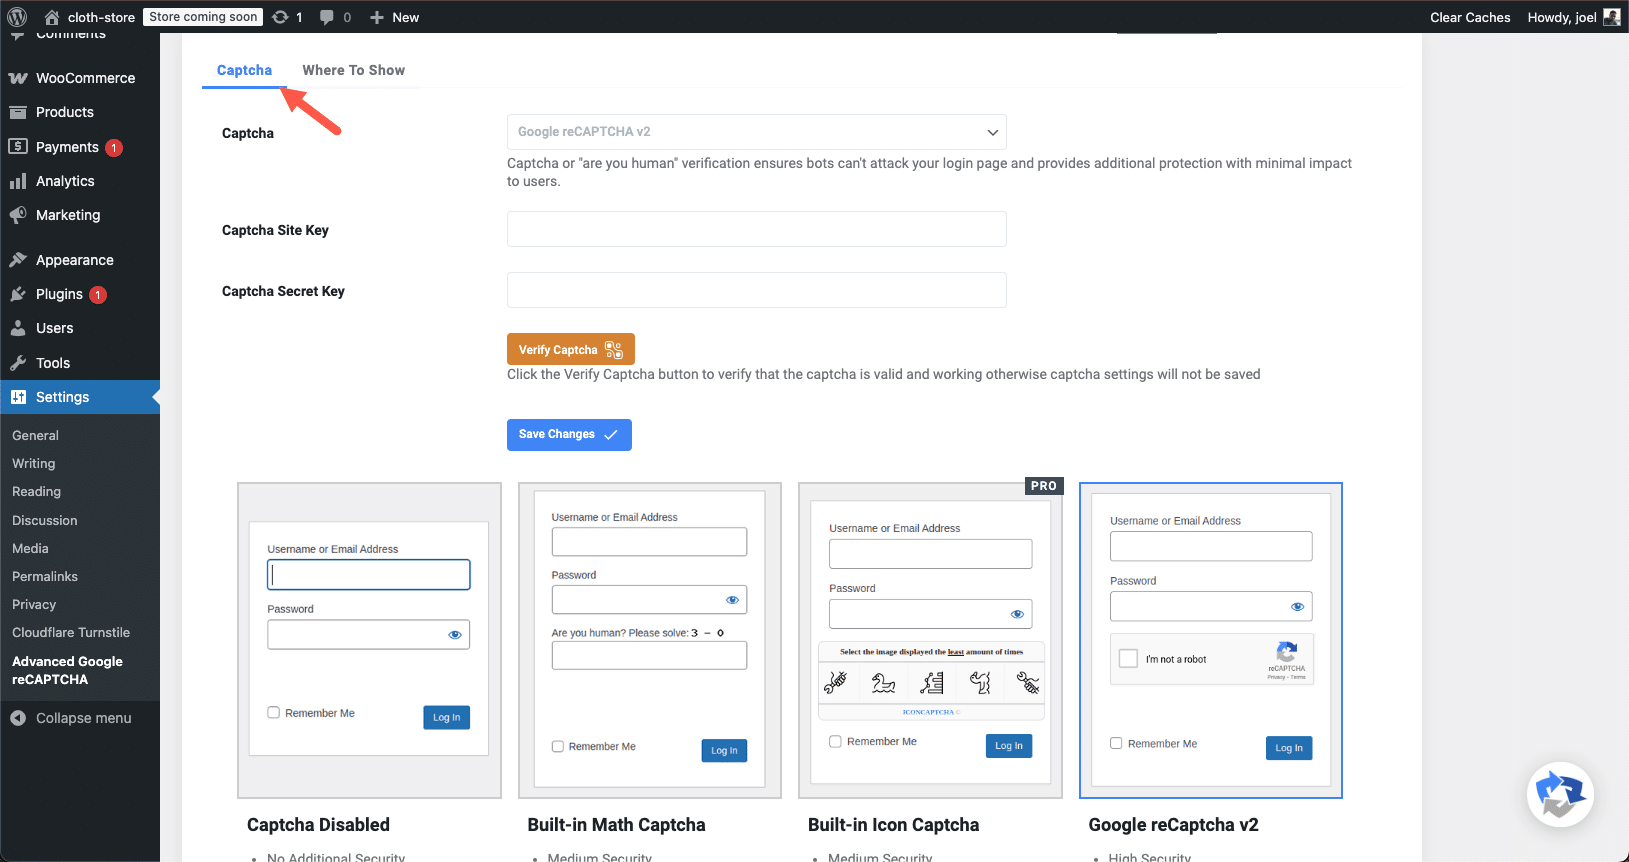
在 WordPress 中配置 Advanced Google reCAPTCHA。
此外,選擇驗證碼的顯示方式,然後切換到“Where To Show”選項卡。在這裡,啟用表單上的驗證碼,並選中 WooCommerce Checkout 和 WooCommerce Registration。最後,點選“Save Changes”應用設定。
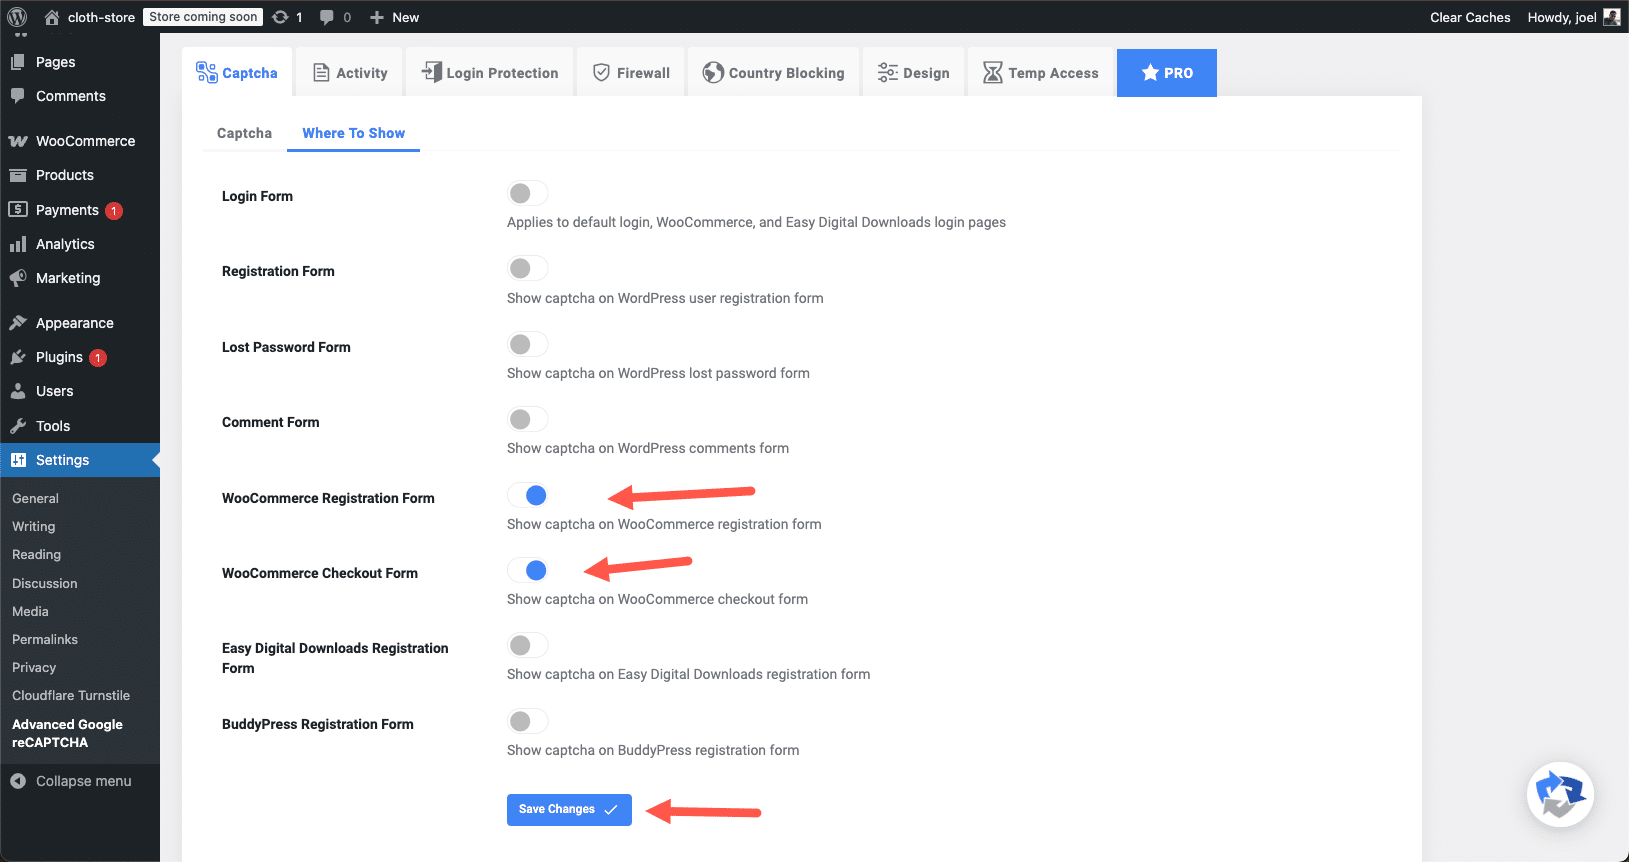
在 WooCommerce 結賬和登錄檔單上啟用 Google reCAPTCHA。
設定完成後,開啟店鋪的結賬頁面驗證驗證碼是否有效。如果一切配置正確,“I’m not a robot”覈取方塊現在應該會出現在需要的地方。
3. 使用反垃圾郵件外掛
雖然驗證碼有助於防止機器人提交垃圾訂單,但這並不總是足夠的,尤其是在應對更復雜的垃圾郵件策略時。因此,您需要反垃圾郵件外掛。這些外掛的作用是自動過濾垃圾郵件、阻止可疑的 IP 地址,並在欺詐性訂單到達 WooCommerce 資料庫之前對其進行檢測。
WooCommerce 並不包含內建的訂單反垃圾郵件保護功能,因此使用專用外掛可以大大減少垃圾郵件,同時又不會給真正的客戶增加麻煩。
有幾種有效的反垃圾郵件外掛可供使用,但 WooCommerce 商店的兩個最佳選擇是 CleanTalk Spam Protect 和 Akismet。讓我們來看看如何安裝和配置專門為WooCommerce 訂單垃圾郵件防護設計的 CleanTalk。
如何為WooCommerce設定CleanTalk垃圾郵件防護程式
CleanTalk 是一種高階反垃圾郵件服務,可以過濾垃圾訂單、阻止虛假賬戶、防止殭屍註冊–所有這些都不需要驗證碼。它在後臺悄無聲息地工作,根據其全球垃圾郵件資料庫檢查訂單和表單提交。
要開始使用,請進入 WordPress 儀表板,導航至外掛>安裝新外掛。在搜尋欄中輸入 CleanTalk Spam Protect 。找到後,點選立即安裝,然後啟用。
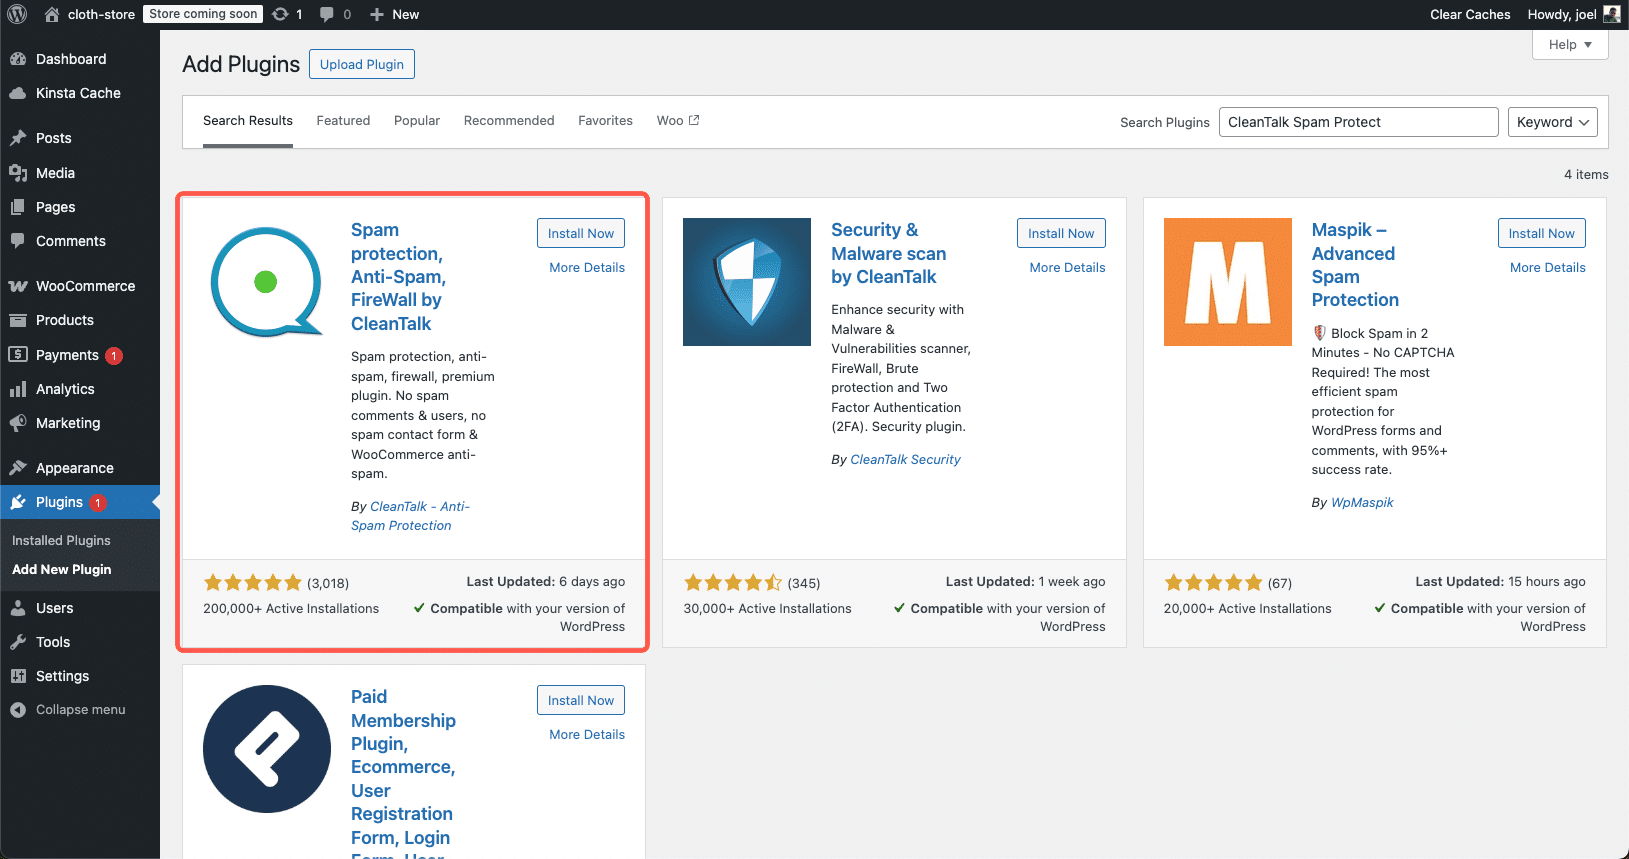
為WooCommerce安裝和設定CleanTalk Spam Protect。
啟用後,進入設定 > Anti-Spam by CleanTalk。系統會提示您輸入 Access Key。由於CleanTalk是一項付費服務,因此您需要在 CleanTalk 網站上建立一個賬戶並註冊訂閱。
註冊後,CleanTalk會向你提供一個 Access Key,你需要將其複製並貼上到外掛設定中。
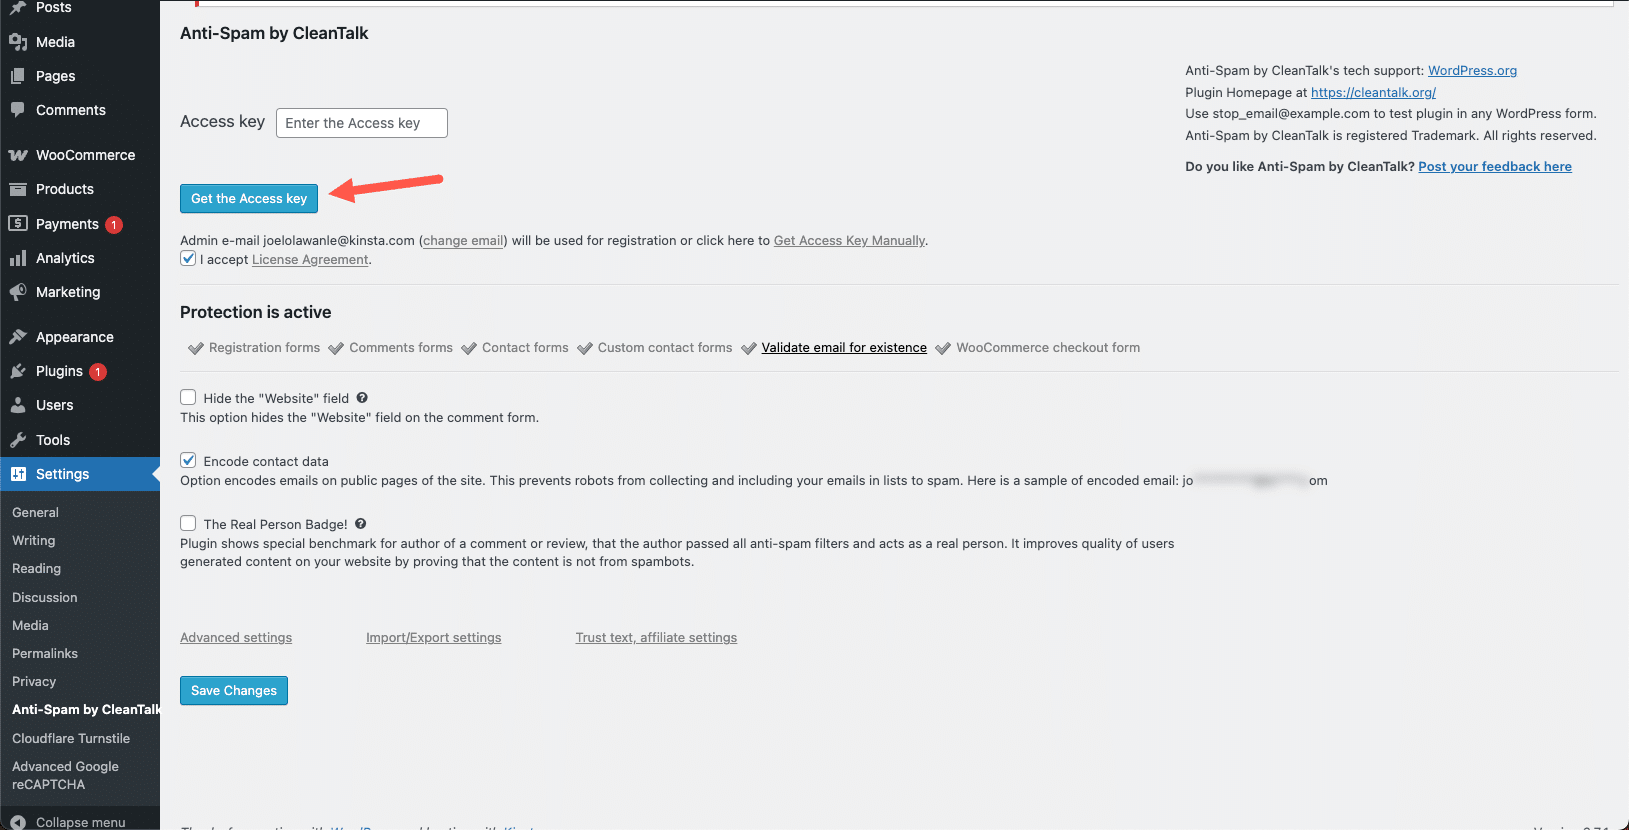
輸入 CleanTalk 訪問金鑰啟用垃圾郵件保護。
輸入金鑰後,點選“Advanced settings”連結並向下滾動到“WooCommerce”部分,就可以確認該設定是否適用於 WooCommerce 結賬表單。
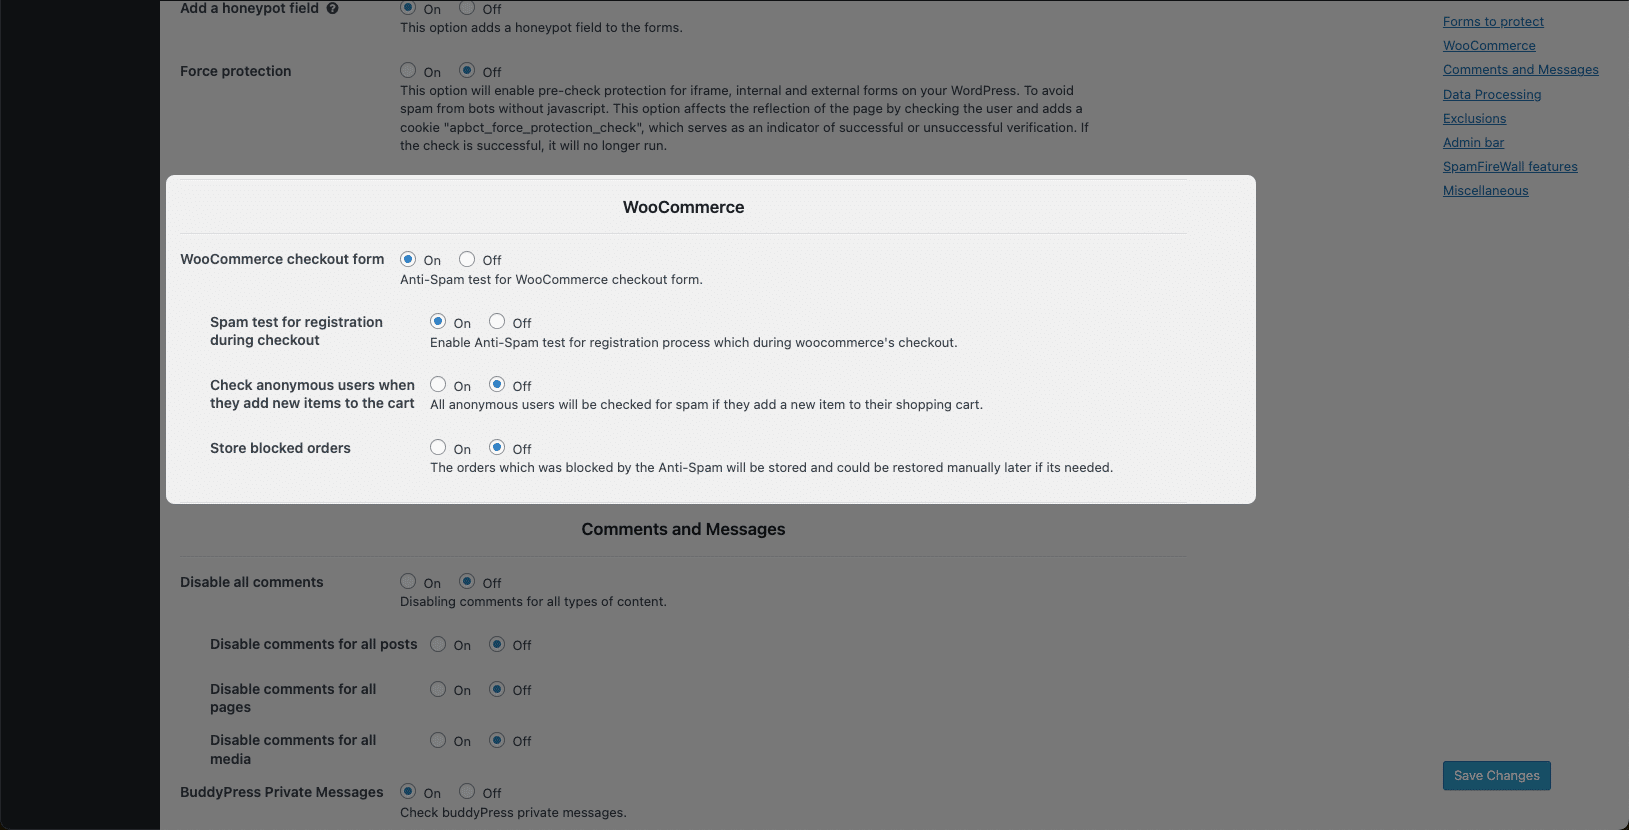
為 WooCommerce 垃圾郵件保護配置 CleanTalk 設定。
啟用這些設定後,請單擊“Save Changes”。現在,您的WooCommerce商店就可以防止垃圾訂單和虛假註冊了。
4. 禁用訪客結賬
One cause of WooCommerce spam orders is that guest checkout is enabled by default.
Allowing customers to place orders without creating an account speeds up the checkout process, but it also allows bots and fraudsters to submit fake orders without restriction.
Disabling guest checkout forces customers to create an account before placing an order. This simple step adds a layer of security because bots often struggle with completing the additional fields required for registration, especially when combined with CAPTCHA or email verification.
However, before disabling guest checkout, consider how it might impact your sales. Some customers prefer a frictionless shopping experience and might abandon their cart if forced to create an account. If your store has many one-time buyers, you might want to explore other security measures before fully turning off guest checkout.
To disable guest checkout, go to your WordPress dashboard and navigate to WooCommerce > Settings. In the settings menu, click on the Accounts & Privacy tab.
造成 WooCommerce 垃圾訂單的原因之一是預設啟用了訪客結賬。
允許客戶在不建立賬戶的情況下下單可以加快結賬流程,但同時也允許機器人和欺詐者不受限制地提交虛假訂單。
禁用訪客結賬會迫使顧客在下訂單前建立一個賬戶。這個簡單的步驟增加了一層安全性,因為機器人往往難以完成註冊所需的額外欄位,尤其是在結合驗證碼或電子郵件驗證的情況下。
不過,在禁用訪客結賬之前,請考慮一下這會對您的銷售產生什麼影響。有些客戶喜歡無摩擦的購物體驗,如果被迫建立賬戶,他們可能會放棄購物車。如果你的商店有很多一次性買家,在完全關閉遊客結賬之前,你可能需要探索其他安全措施。
要禁用訪客結賬,請進入 WordPress 儀表板並導航至 WooCommerce>Settings。在設定選單中,點選“Accounts & Privacy”選項卡。
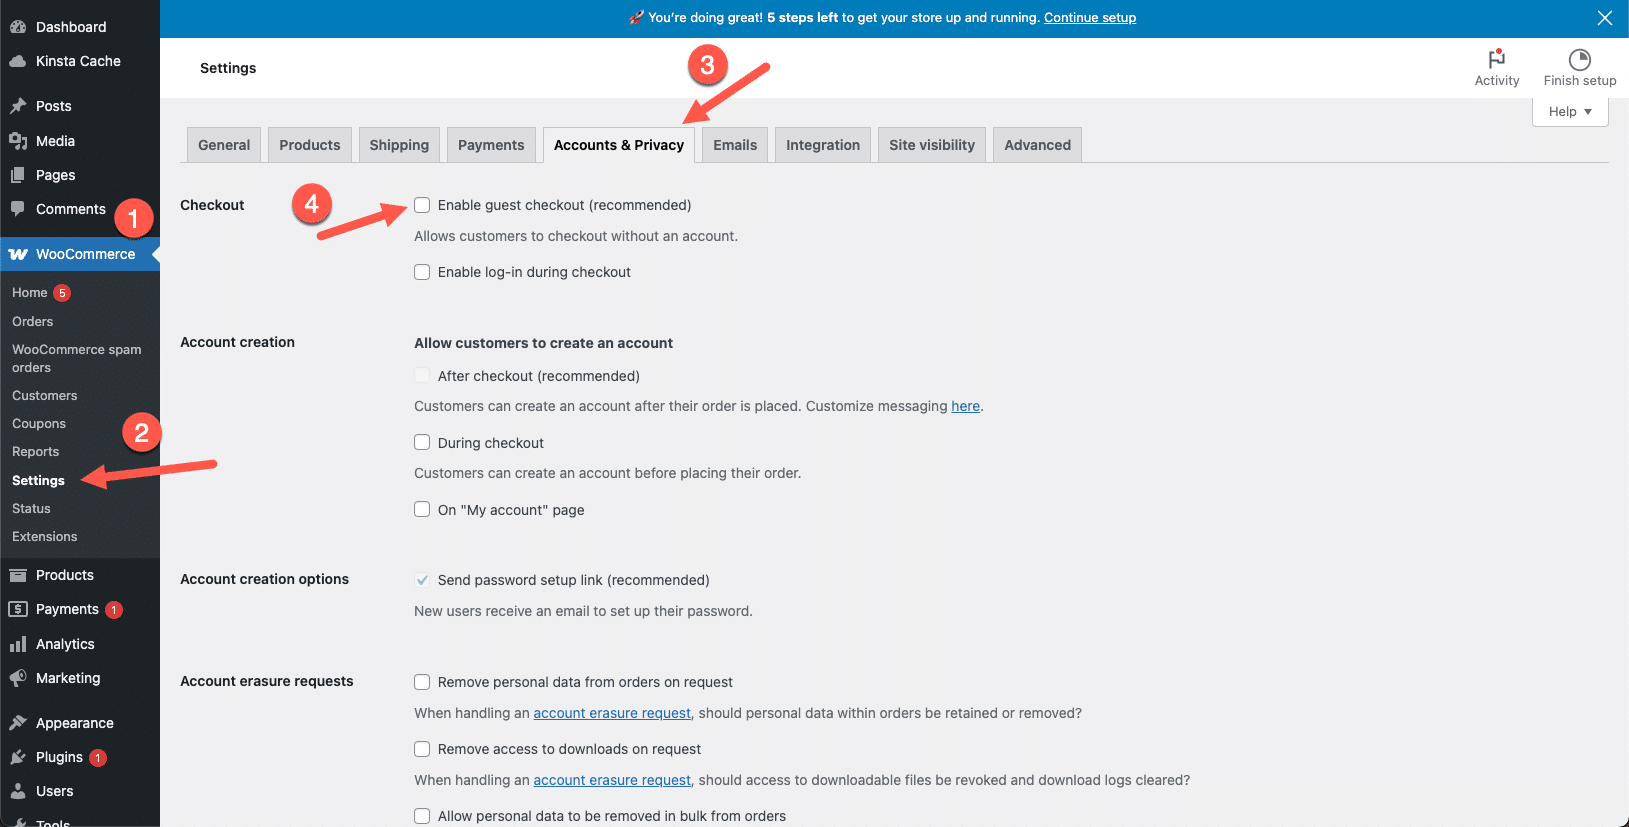 Disabling guest checkout in WooCommerce to prevent spam orders.
Once done, scroll down and click Save Changes.
Once guest checkout is disabled, customers will no longer be able to check out as guests. Instead, they will be prompted to either log in to an existing account or create a new one before completing their purchase.
5. Use anti-fraud plugins
Even with CAPTCHA and anti-spam measures, some fraudulent transactions can still pass through. This is especially common with scammers using stolen credit cards, fake customer details, or mass-generated orders to exploit WooCommerce stores.
To combat this, anti-fraud plugins add an extra layer of security by blocking suspicious transactions before they are completed.
These plugins analyze various risk factors, such as IP addresses, email domains, billing details, and unusual order behaviors, to detect potential fraud. If an order is flagged as high risk, the plugin can automatically block it, hold it for manual review, or notify the store admin.
One of the best options available for WooCommerce is Fraud Prevention For WooCommerce and EDD (formerly Woo Blocker Lite). Let’s go over how to set it up.
How to set up Fraud Prevention For WooCommerce
Fraud Prevention For WooCommerce and EDD is a lightweight yet powerful anti-fraud plugin designed to prevent fake orders and spam transactions. It allows store owners to create custom fraud prevention rules, view blacklisted user details, and generate fraud reports — all without affecting real customers.
To install it, go to your WordPress dashboard, navigate to Plugins > Add New, and search for Fraud Prevention For WooCommerce and EDD. Once you find it, click Install Now, then Activate.
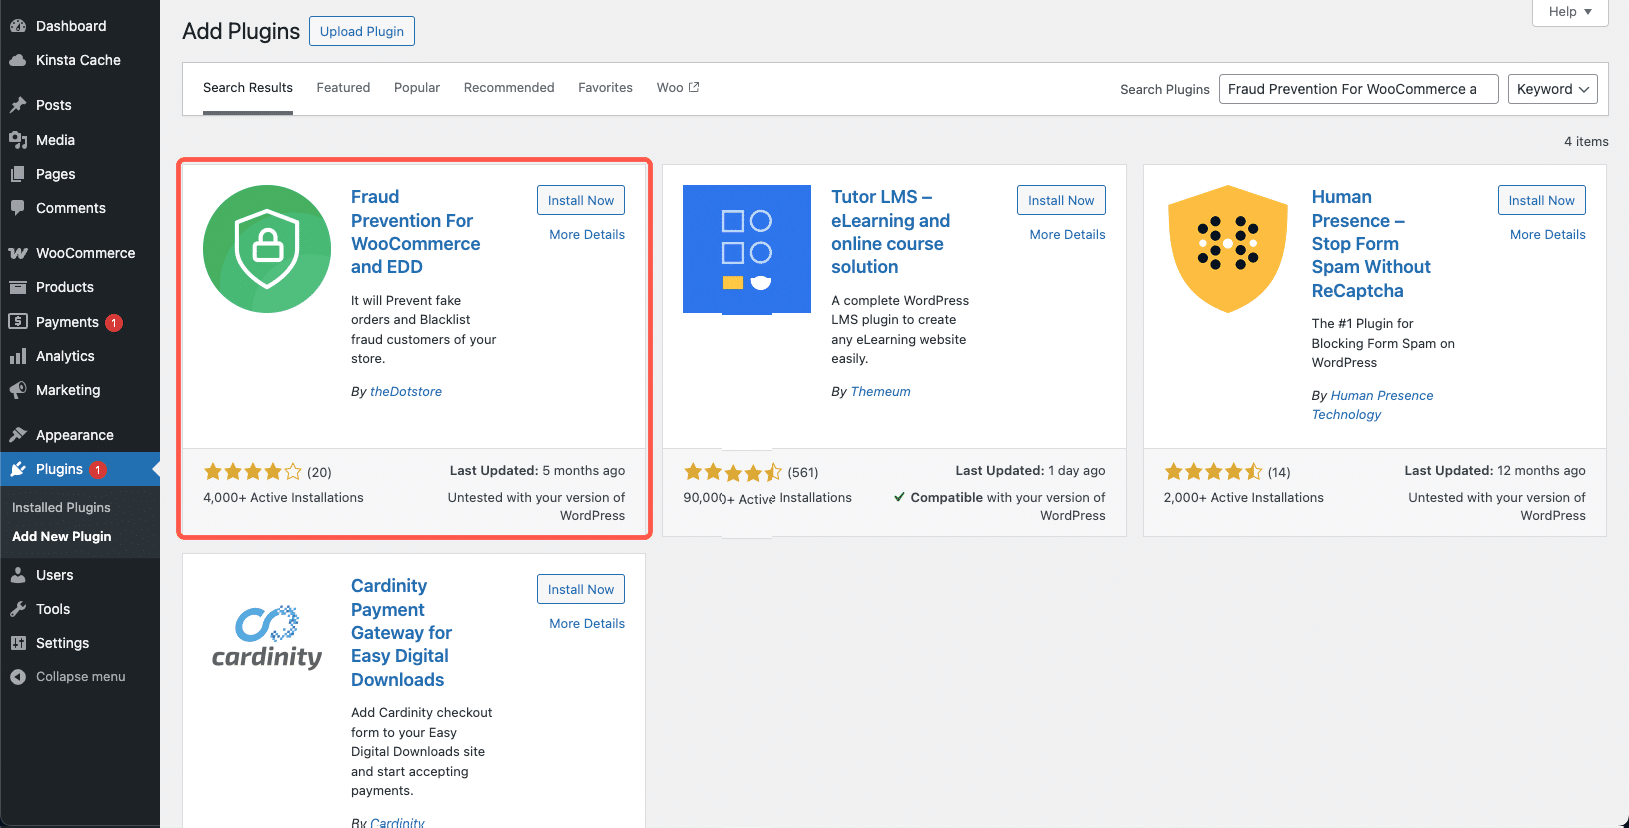 Installing the Fraud Prevention for WooCommerce plugin.
After activation, you will be presented with a demo video explaining what the plugin can do. You can access the Fraud Prevention settings page in Dotstore Plugins > Fraud Prevention. This is where you’ll configure the fraud detection settings for your store.
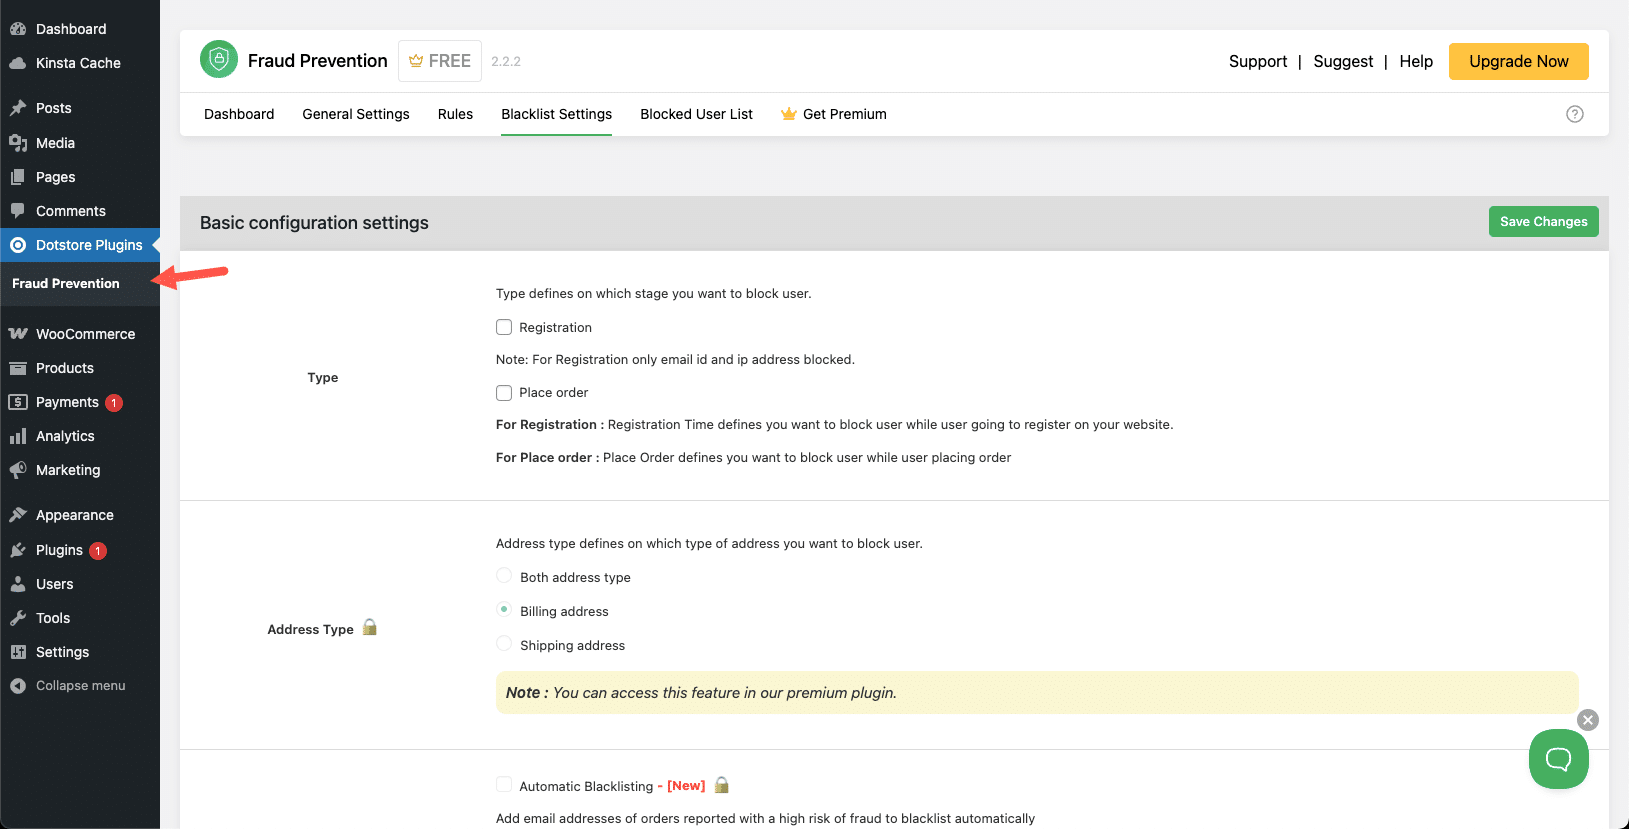 Configuring Fraud Prevention settings to block suspicious orders.
Decide whether you want to block fraudulent users during registration, checkout, or both by selecting the appropriate options in the Blacklist Settings section. Check the boxes based on when you want the plugin to detect and prevent fraudulent activity.
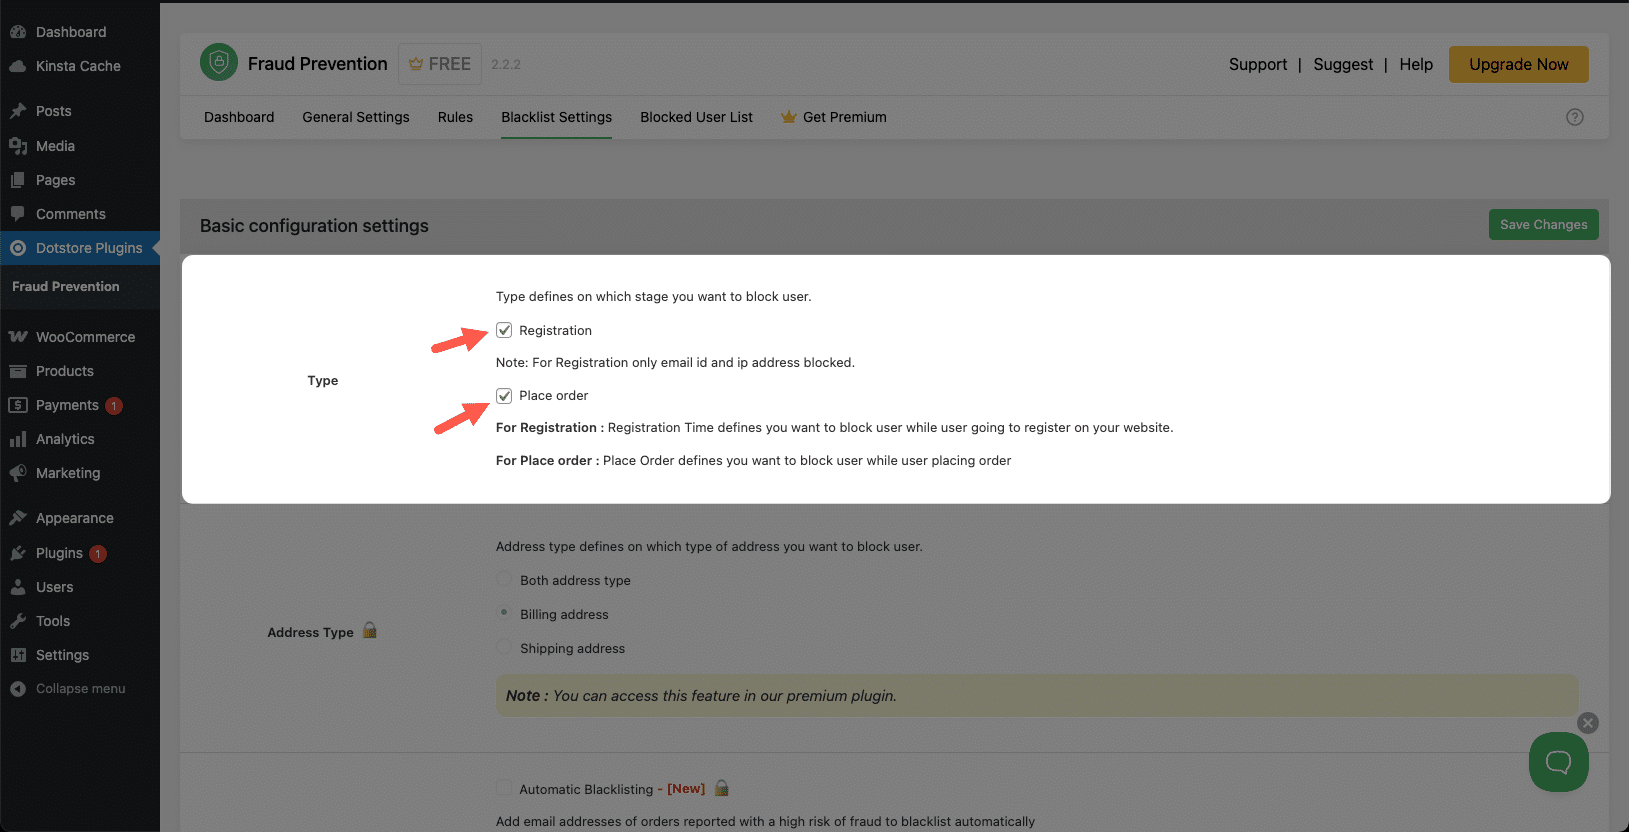 Setting up blacklist rules in Fraud Prevention for WooCommerce.
You can also manually blacklist specific users based on their email address, IP address, state, or ZIP code. If you have noticed repeat fraud attempts from a particular source, adding them to the blacklist will prevent future spam orders from being placed.
 Manually blacklisting fraudulent users in WooCommerce.
Additionally, the plugin provides a detailed fraud report that allows you to monitor suspicious activity and track blocked orders. This helps store owners quickly identify patterns in fraudulent transactions and take proactive steps to secure their WooCommerce site.
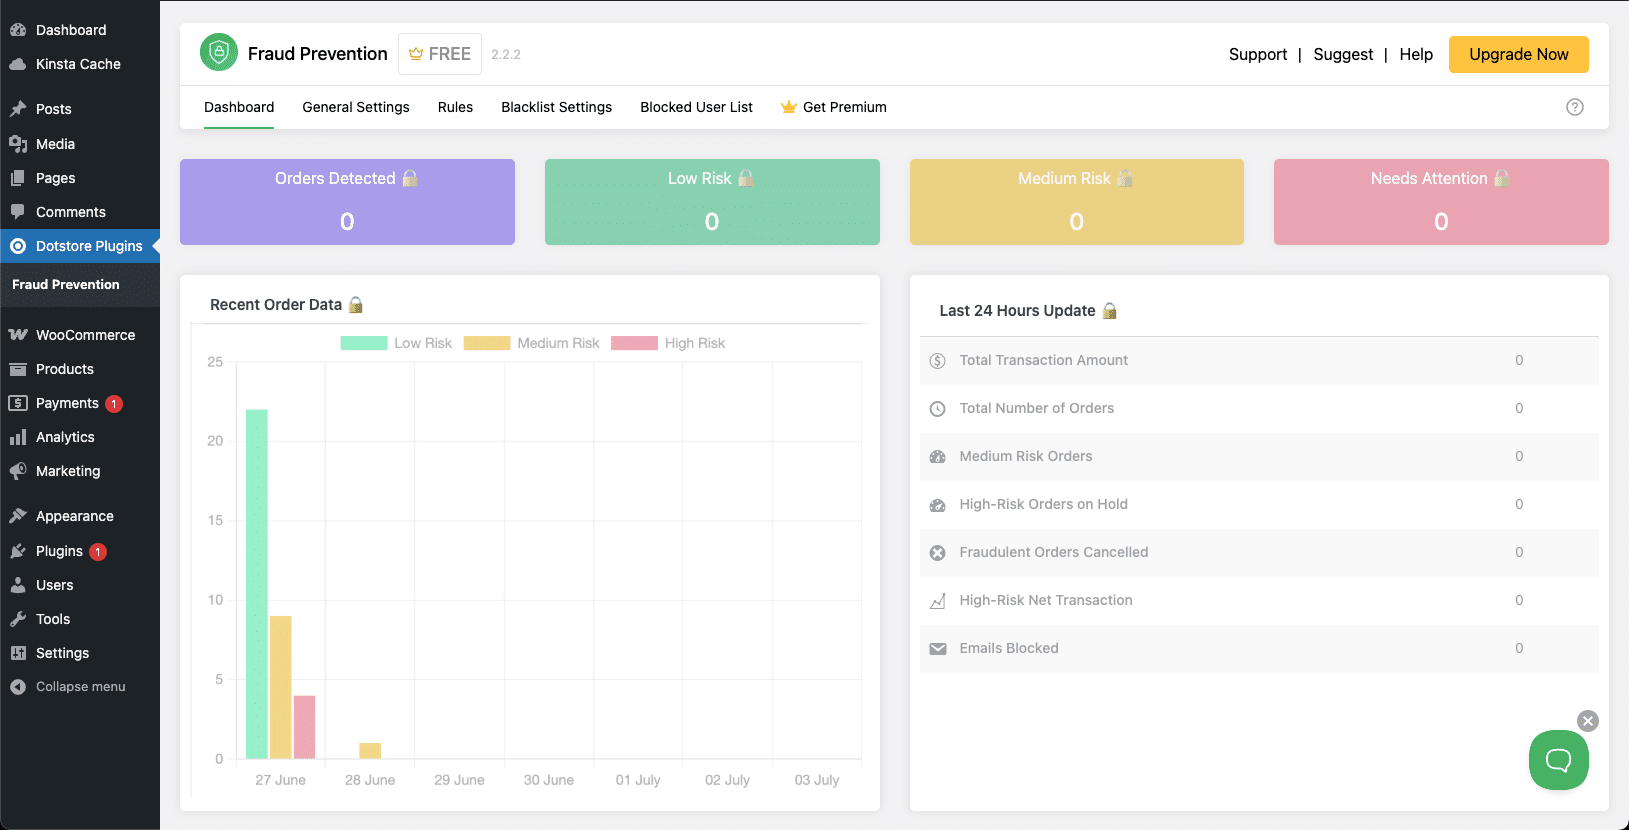 Monitoring fraudulent activity in the WooCommerce fraud report dashboard.
Once you’ve configured the necessary settings, click Save Changes. Your store is now protected against common fraud tactics and spam orders.
Summary
WooCommerce order spam can be a serious issue, but with the right security measures, you can keep your store safe.
At Kinsta, our 24/7/365 security team, three-minute malware scans, and enterprise-grade Cloudflare protection help block spam and fraudulent activity before it reaches your store. Our high-performance WooCommerce hosting can boost your store’s speed by up to 200%, ensuring smooth and secure transactions.


評論留言